Simple Photo Book
Simple Photo Book
This editor is designed to offer simple album type products with the possibility of:
- Automatic insertion of images on the pages to assist with online editing.
- Adding images to the page design
- Swapping images between pages by dragging and dropping the image onto the page.
- Changing the background color of the sheets and cover during editing
- Changing the cover design: with an image, automatically creating a collage, or without an image
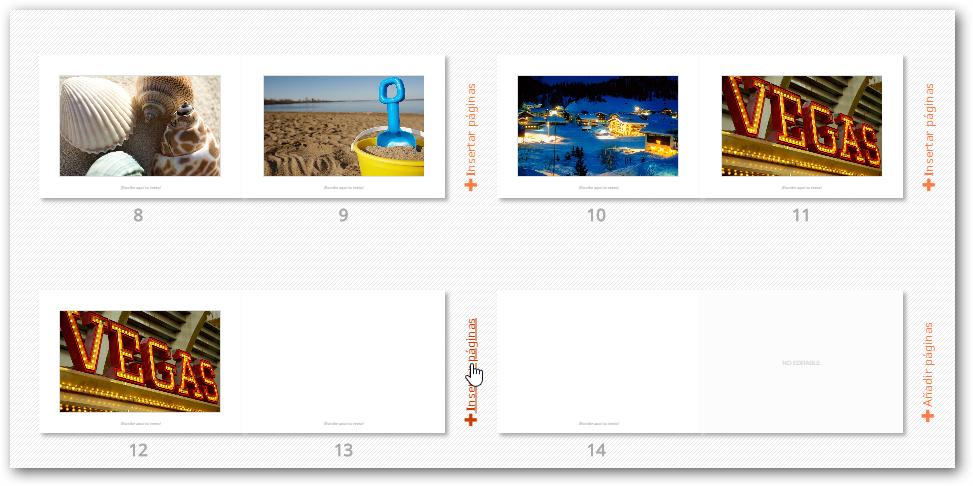
- Adding pages to the album at the end of the album or interspersing them between pages
Product Creation
To register new products, we will press the Create button from the editor back office and select the “Simple Photo Book” editor.
Product Variants
The system allows adding more variants to the product, which can have different characteristics from each other.
In each variant, we will have to configure all product characteristics, production codes, name, sizes, etc.
We can personalize the text of the Variants field with a name that is more descriptive for the customer; this name will be displayed on screen to offer the different variants.
The SKU field allows personalizing each variant with an alphanumeric code that can be used as a billing code.
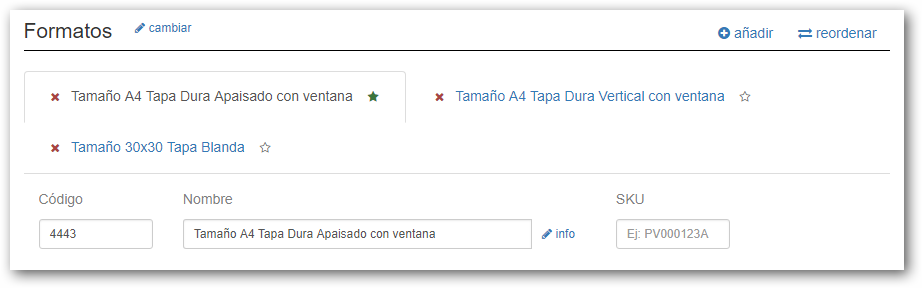
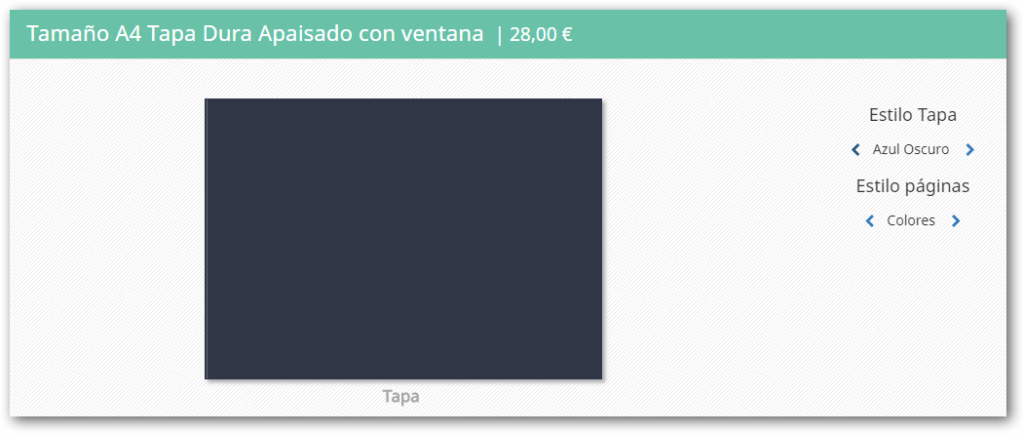
For example, we can create a product that we will call “A4 Size Hardcover with Window”, and add different Variants that we will call “Formats”, which could be the different sizes we want to offer for this product. Each variant can have a different size and different prices.
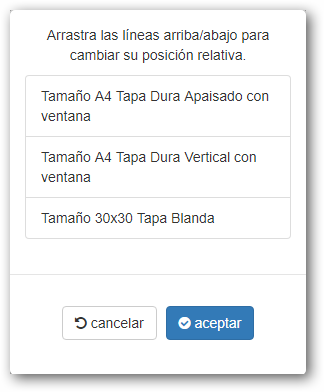
Through the “Reorder” option, we can organize the position in which we want to show the variants in the editor, moving the different variants up or down.

Default “Favorite” Variant
In the variants tab, one of them can be marked as “default” (or “favorite”).
This is done by clicking on the “star” symbol that appears to the right of the variant name.
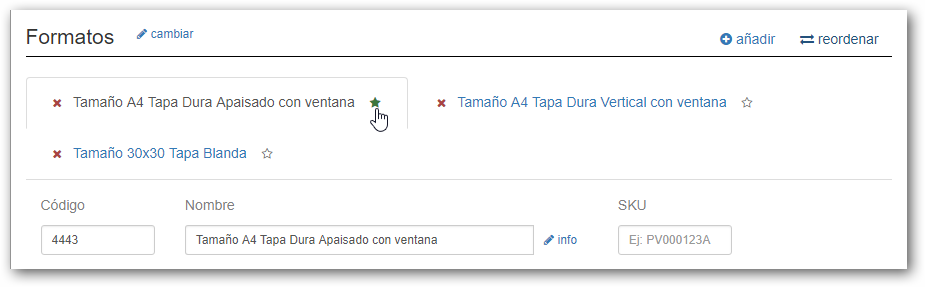
When editing the product, the variant marked as the default will be shown to the customer as the first selectable option.
Pricing Model
This editor allows defining the price of the album based on the number of pages the product has. In the example, we see that it is possible to add a page range and assign a price to that range.
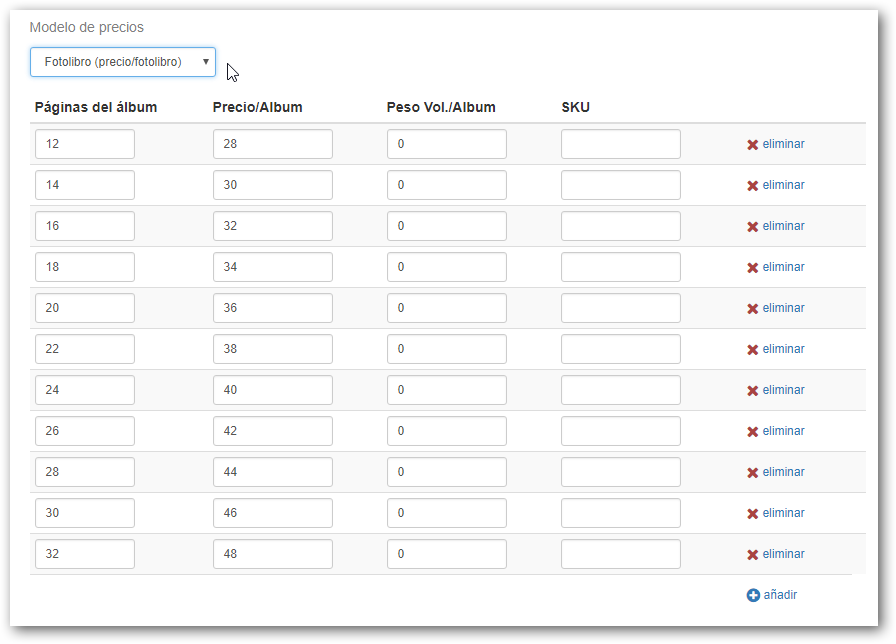
In the online editor, the option to add pages appears after each printing sheet on the screen and at the end of the design.
Components
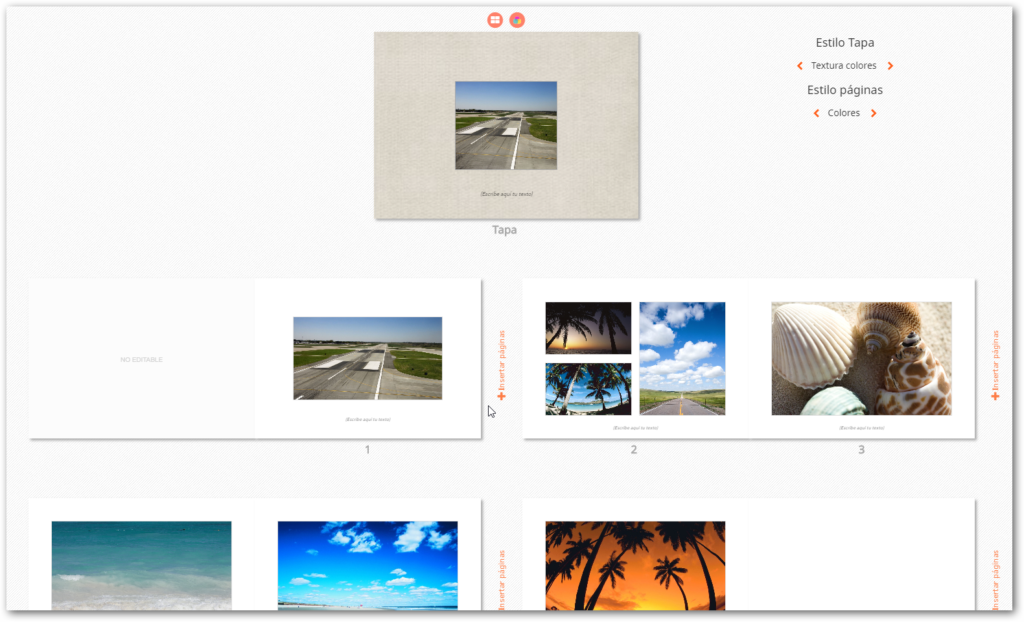
In the Simple Photo Book editor, we can configure the Cover and Pages separately. In the online editor, only the front part of the cover is displayed, as if the photo book were closed. This is to prevent products with very large cover dimensions from appearing too small on the screen, as it must be taken into account that the application must also be usable from a smartphone device.
To do this, there are two tabs where the different parameters are configured:
- Cover or page type
- Cover and page dimensions
- Cover and page design
- Adding text at the bottom of the cover and pages
- Cover style
Cover Type
The different cover types available to configure are: printable front cover, printed cover, partially printable front cover, and non-printable front cover.
Printable Front Cover
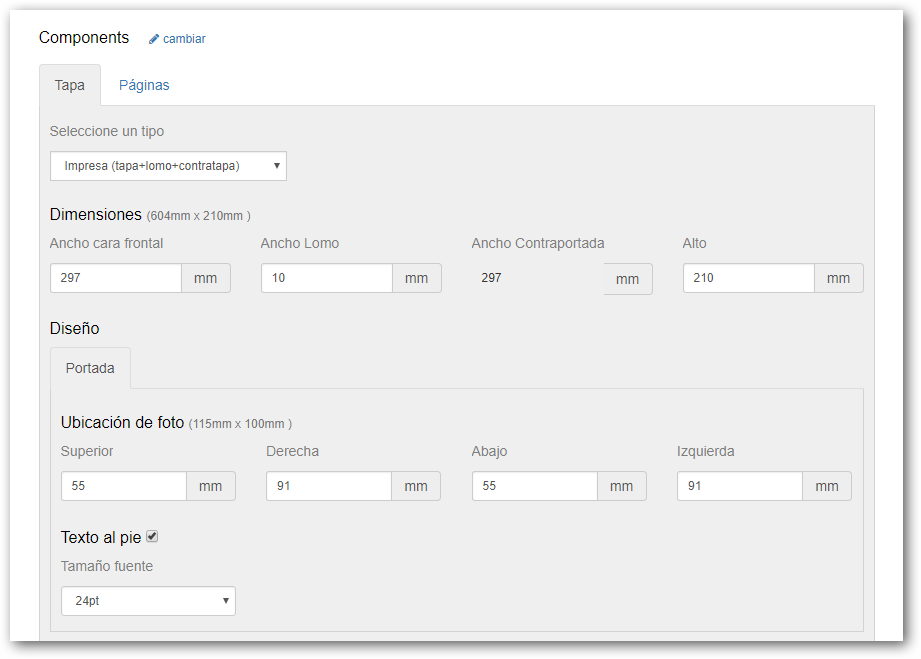
This type of cover is designed for a Wire-o bound photo book that can have the cover personalized with an image.
In the Dimensions section, we can configure the size of the front cover in millimeters. It is also possible to configure the area where the cover image will be located.
Optionally, it is possible to add text at the bottom of this image by activating the Footer Text option and selecting the Font Size.
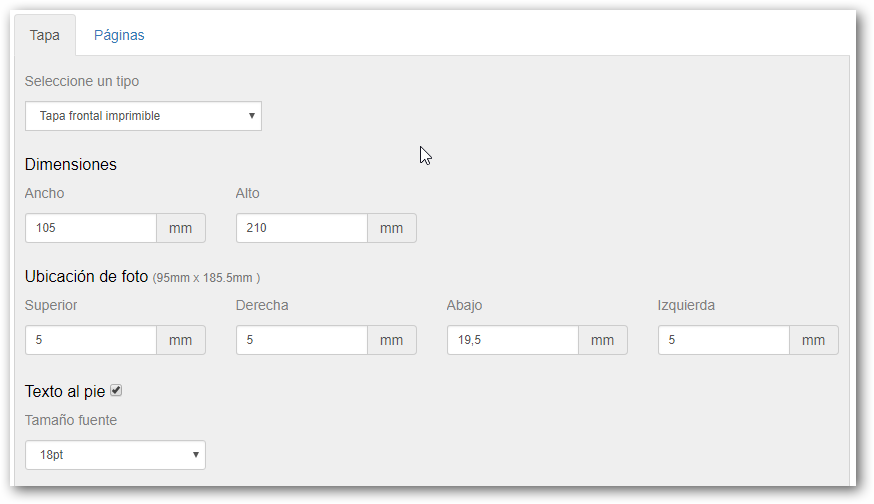
We can also configure it to automatically generate a Photo Collage or a central text on the cover by configuring the Cover Layout Options.

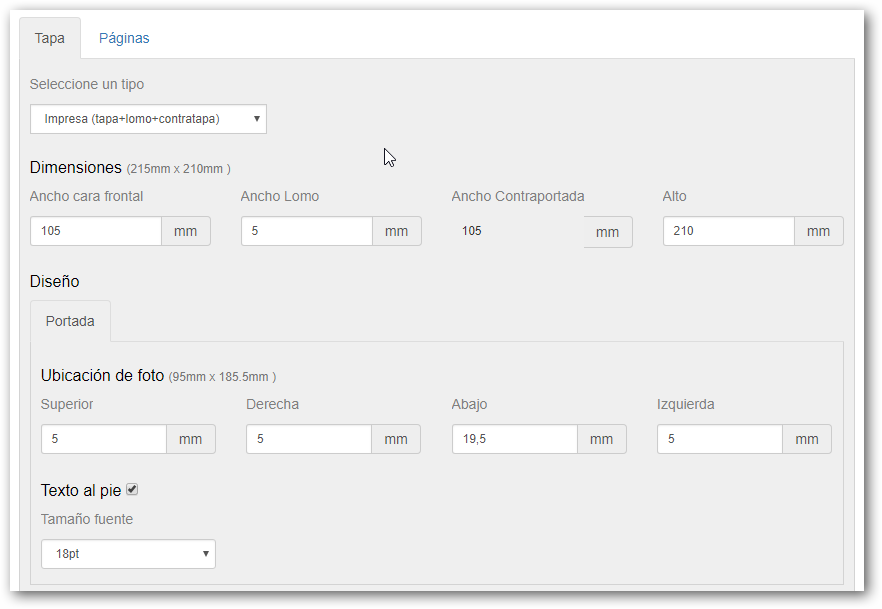
Printed Cover (cover+spine+back cover)
This type of cover is designed for a hard cover bound photo book. The image will be used to cover the front and back cover. For the dimensions to be appropriate, the possibility of configuring the Spine Width has been added to this option. It is important to note that the spine width is fixed.
Partially Printable Front Cover
Front cover where it is possible to configure the location of the printable area and the location of the photo separately. A text can also be configured within the printable area.

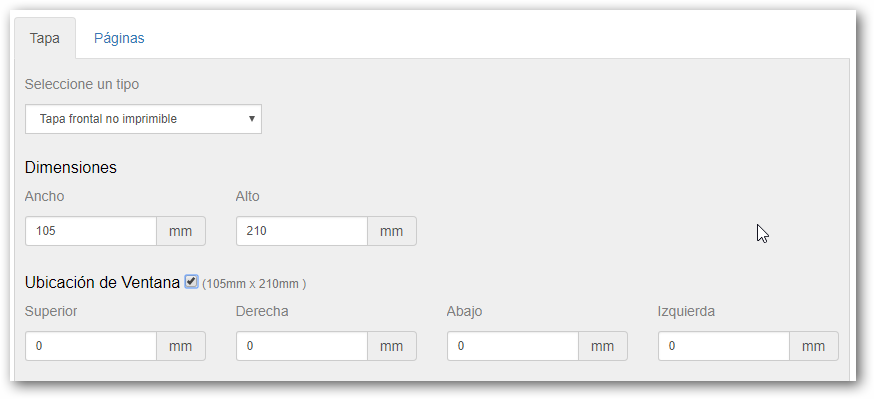
Non-Printable Front Cover
This option is intended for binding with covers that have special designs or finishes. It would also cover the “Unibind – FastBind” type option.
It is also possible to create a space for a window, for covers that come with a window.
Configuration is necessary even if the cover is not printed to generate the screen representation dimensions of the cover in the system.
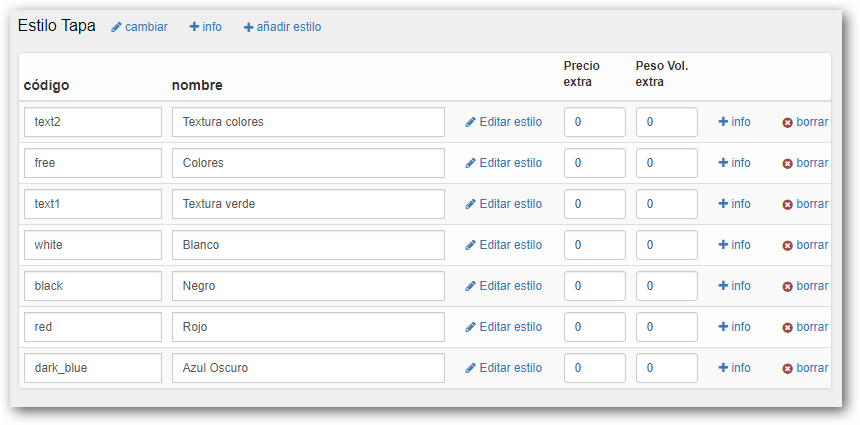
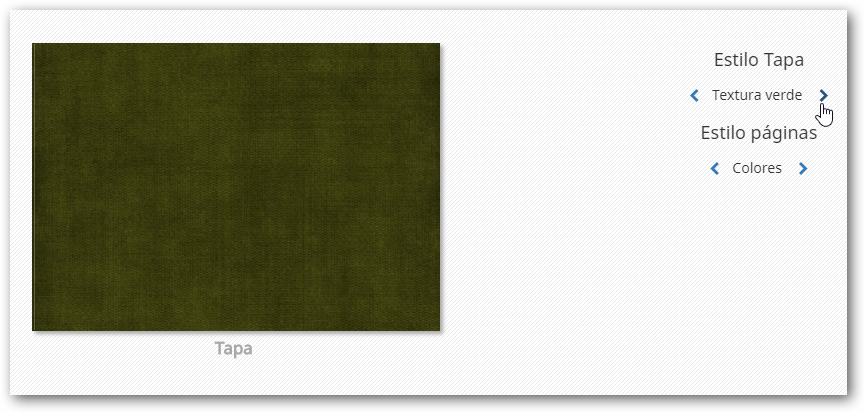
Cover Styles
By configuring different Cover Styles, we enable the solution to display a style selector on the editing screen.
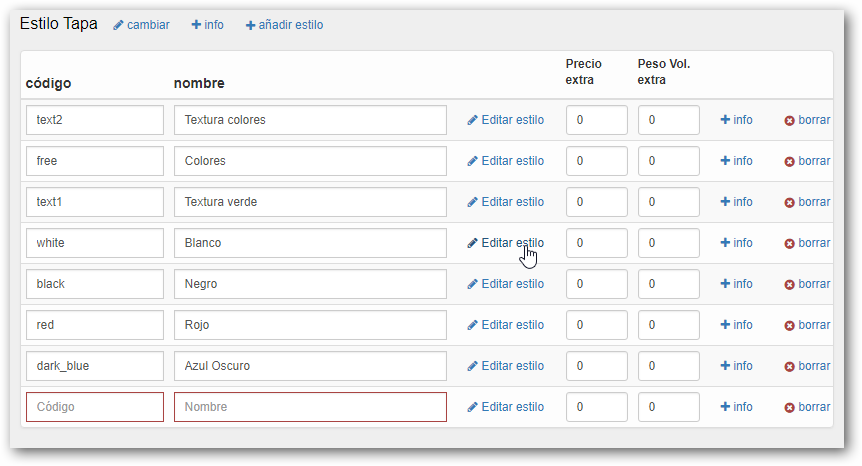
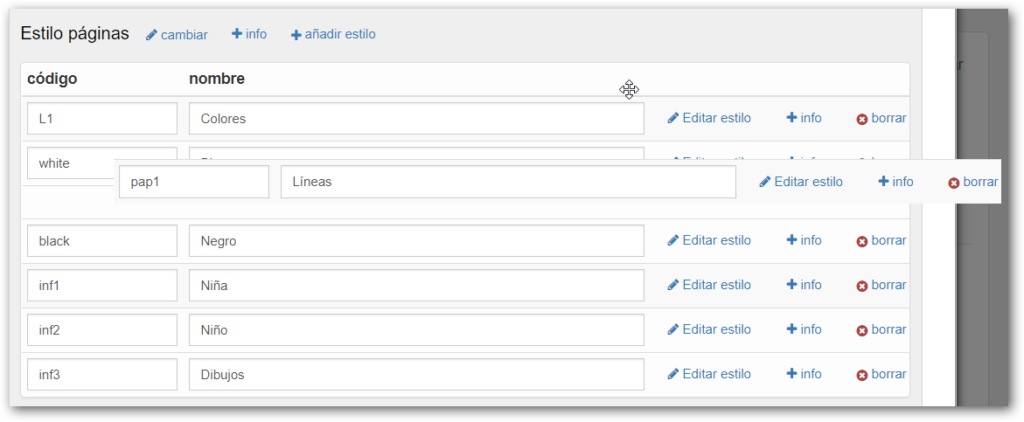
To add a new style, you must select the **+ add style** option. This action adds a new line to the list where we must enter a code, a style name, and an additional price if appropriate.

Once the code and name are configured, you must select **Edit Style**.
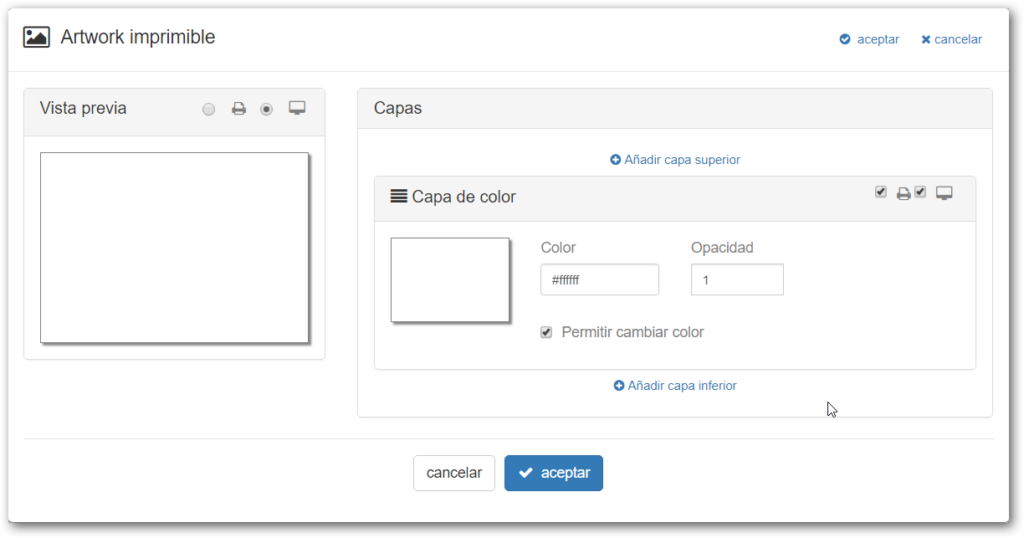
By default, the first layer added is a Color Layer. It is possible to add an upper or lower layer, keeping in mind that the layer order will be the order shown in this option.
Color Layer
A layer that fills the design area with the indicated color.
- Allows selecting a color, indicating the opacity (1=opaque, 0=transparent).
- Check whether we allow the end user to change the background color from a color palette.
- This layer always has the printer and screen options checked.
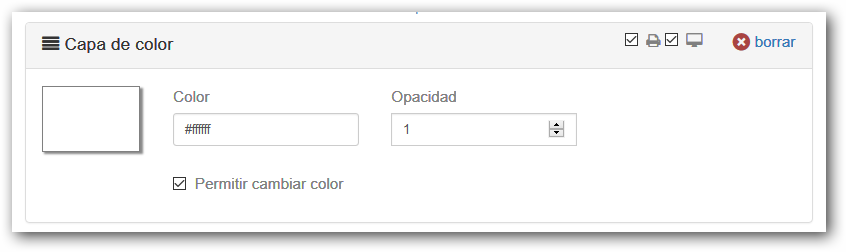
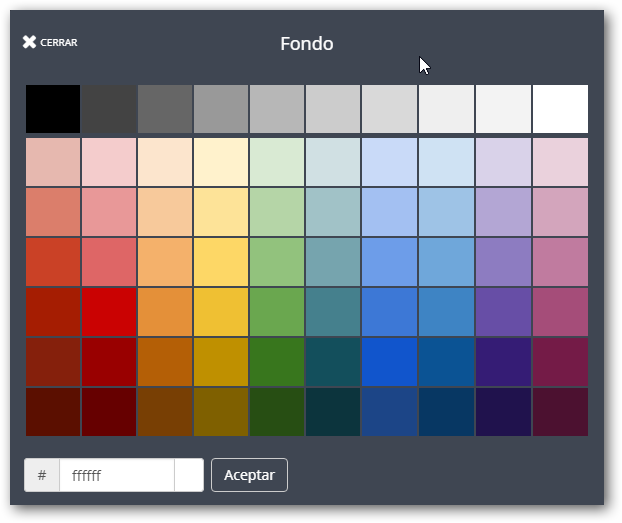
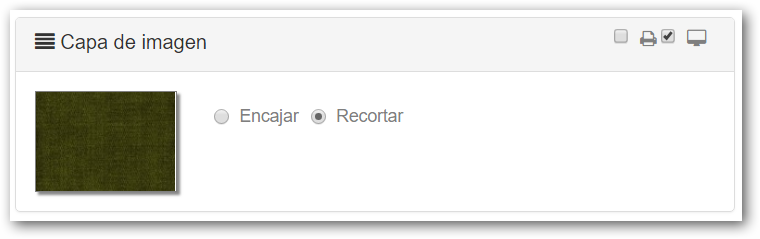
Image Layer
Fills the design area with the indicated image.
- Images in JPG or PNG format can be used, and it is advised not to exceed 10 Mb.
- Allows indicating whether the image fits the design area or fills it.
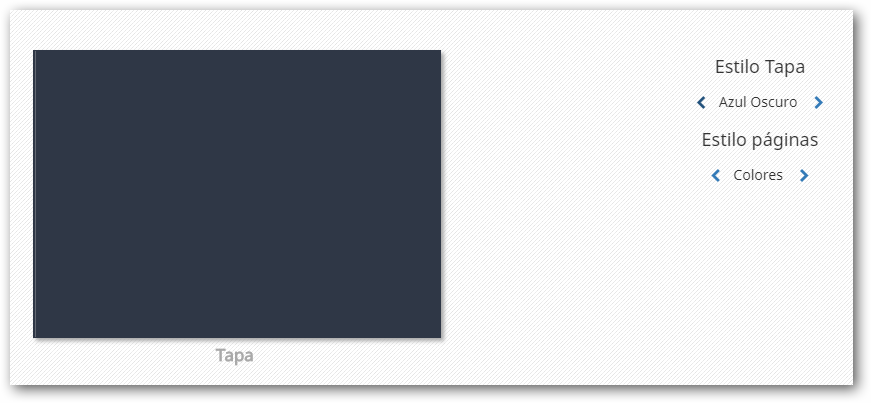
This is what the editor shows. Selecting the Cover Style changes the image.
The order of appearance of the different styles can be changed by selecting the created style line and when the “4 arrows” icon appears.
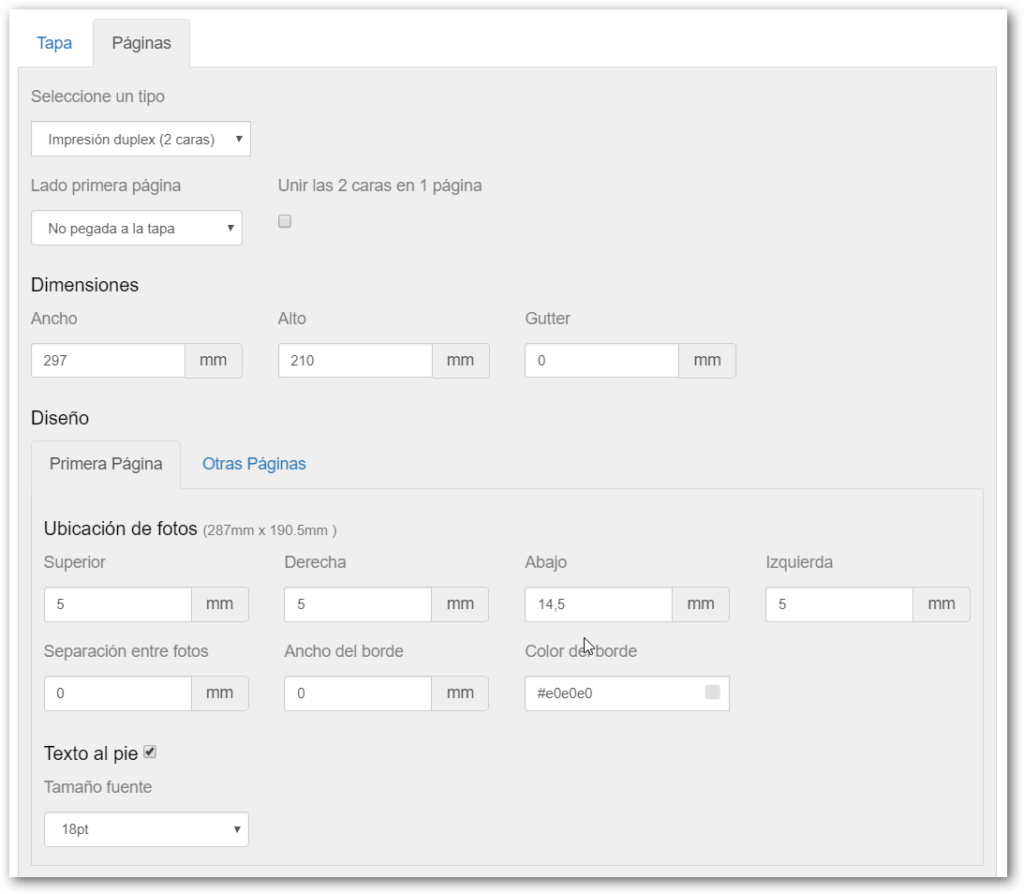
Page Type
This tab is used to configure the photo book pages. Among the different features that can be configured are:
- Printing Type: simplex (1 side) or duplex (2 sides)
- Page dimensions
- Photo location, differentiating between the first and other pages
- Footer text selector
Printing Type
The Simplex (1 side) printing type is designed for photo books that are printed on one side only.
It includes the possibility of adding “Gutter” (binding margin) on the photo book pages.
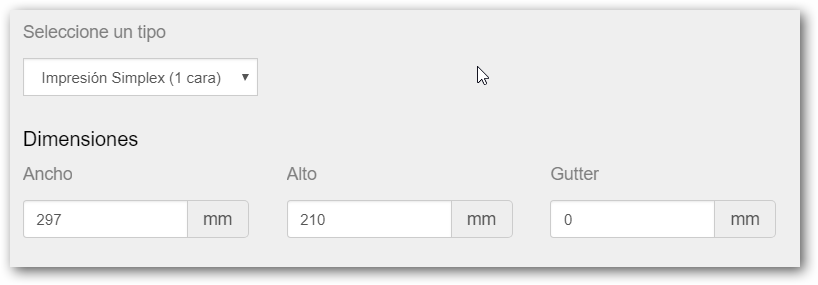
This type of page is displayed in the editor in the following way:

The Duplex (2 sides) printing type is designed for photo books that are printed on both sides.
It is possible to configure whether the first page is glued to the cover and if, when creating the print file with the pages, we prefer to receive the two sides joined on 1 page.
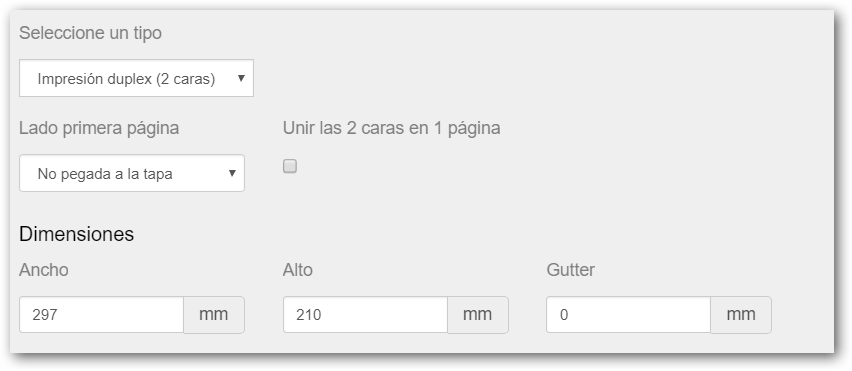
If the first page is selected to be glued to the cover, it would look like this in the editor.
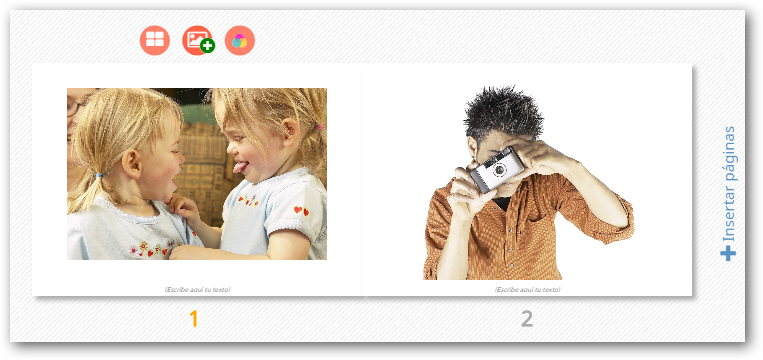
Page Design
In this section, you can configure the location of the photos on both the First Page and the rest of the pages. It is possible to configure a separation space between photos. Each photo could have a default border with a determined width in mm and a color.
Each page can also have a footer text area.

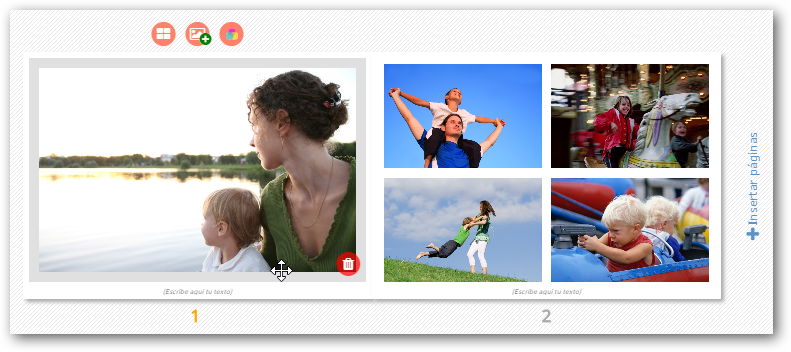
In this case, we have additionally configured a margin on the photo on the first page and a separation between images on Other Pages.
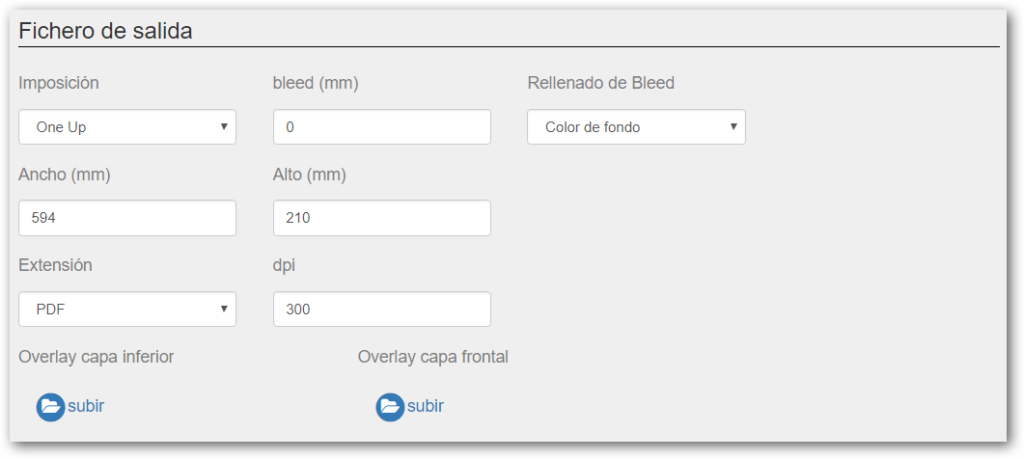
Output File
In this menu, we must configure the paper size dimensions of the files to be printed, whether we want to use imposition, as well as the file format, which can be JPG or PDF.
The image is downloaded for printing with the configured measurements, file format, and dpi.
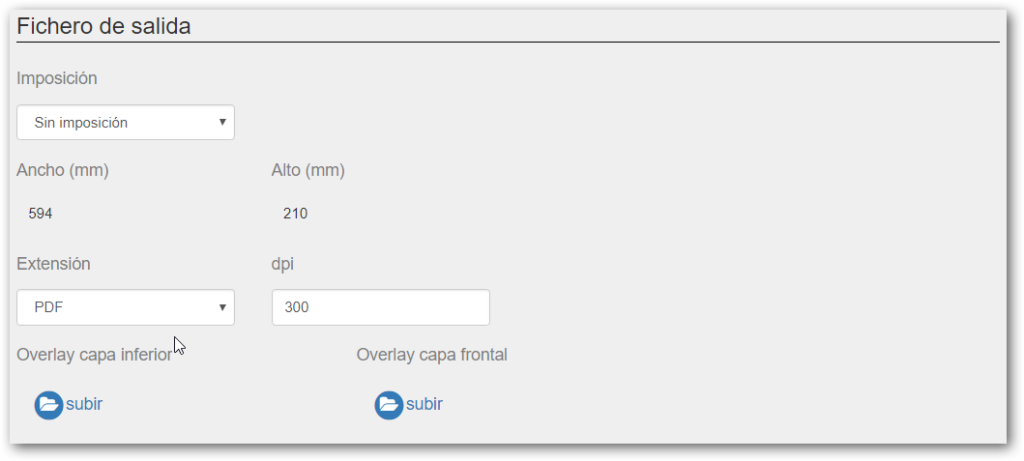
No Imposition
We will use the output file option without imposition when we need the order image with the same product measurements and at the printing resolution, for example, for printing on a minilab, sublimation printers, plotters, etc.
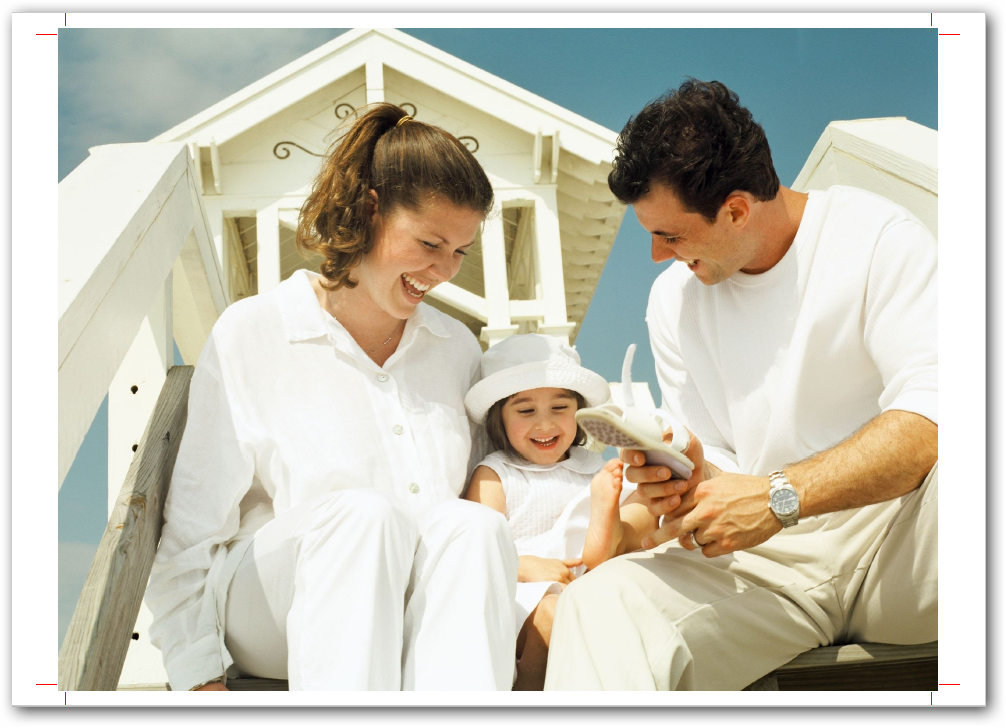
One Up Imposition
One Up imposition can be used if we want to print the image of an order on a larger paper format.
This imposition is generally used when the product image is printed on a larger page and cut marks are necessary.
Multi Up Imposition
With this type of imposition, a PDF file containing multiple pages of the product is generated. In this case, two pages have been received side by side, and there was space for 4 pages in the printing area.

Options
The editor allows selecting two options: cover layout and personalized.
Cover Layout
Allows automatically creating cover configurations that are selectable from the back office. These predefined configurations aid cover editing by selecting the possibility of creating an image collage, changing to a single image, or just a title in the center of the cover from the dropdown menu.