Print Center – Configuration
Print Rules
The Print Center is capable of directing the production it receives based on the flow of each product.
For example, perhaps we have products that we want to send directly to print, such as copies, and perhaps we have products that require pre-production processing, such as a canvas.
For this, there are Print Rules, which define a flow based on the product’s output.
In the mentioned example, we could send the copies to one of the printers for which we have a connector, for example, a Fujifilm DX – DE, so they would print directly, and on the other hand, we could store the Canvas files in a folder, as they require another type of processing.
We have connectors for the market’s leading brands
- Mitsubishi
- DNP
- Citizen
- Noritsu
- Fuji DX-DEIf you want more information about the Fujifilm DX-DE connector click here.
- FUJI – C8If you want more information about the Fujifilm C8 connector click here.
- Windows DriverAllowing automatic printing on all printers connected to the equipment using this system, regardless of the brand.
- Folder OutputStoring the order files in one or more folders.
Modify the Default Print Rule
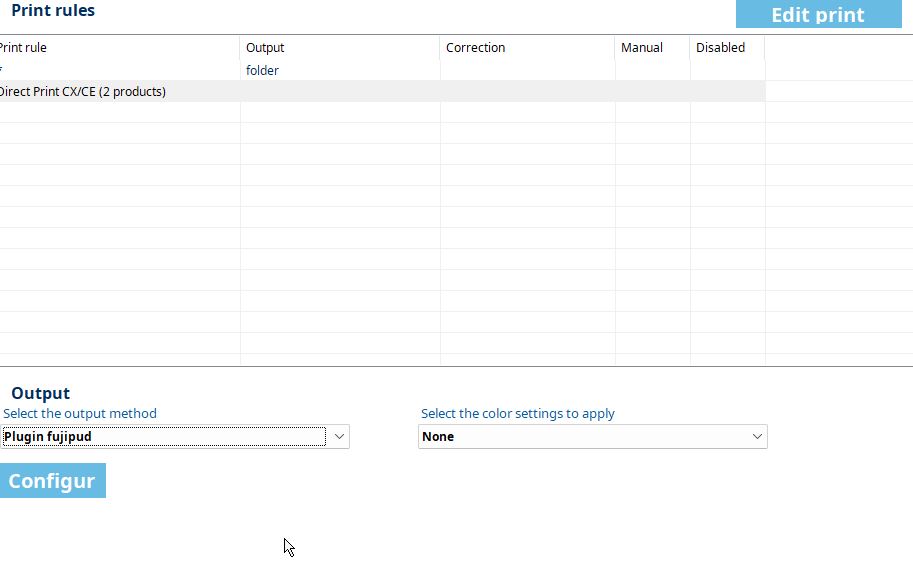
If we access the Print Rules section for the first time, we will see this:
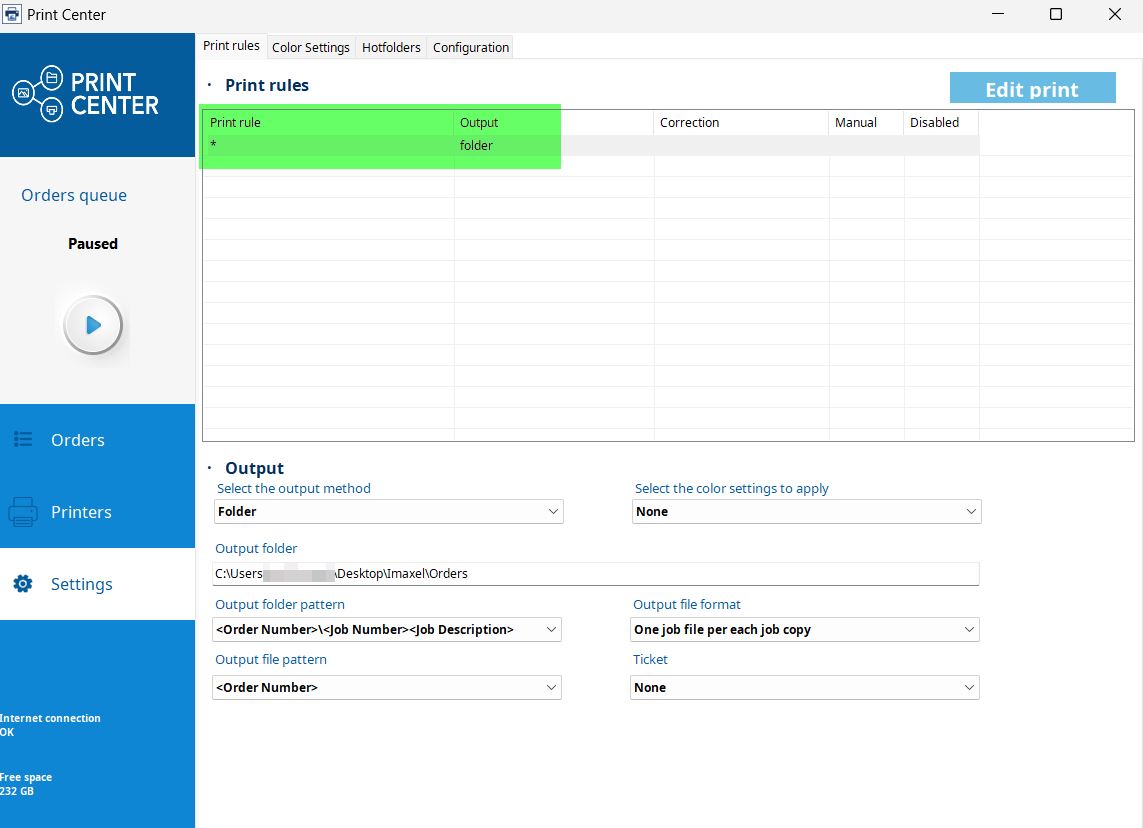
Where there is a default Print Rule created that applies to all products (the * symbol defines all products) whose Output or output method is currently Folder.
Below, we see different options for folder download that we will cover later.
If we wanted to modify the flow for all products, we should modify this rule; for example, we could select another available output method:
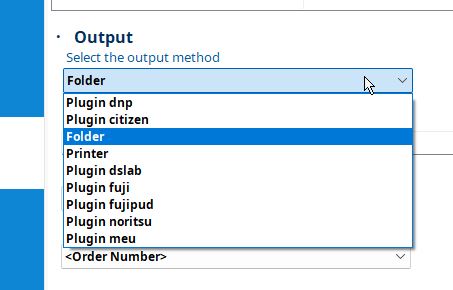
Then, we would simply select the output method and the desired color settings, configure them, and save the changes.
This process is the one to follow to modify the default print rule. If we want to create a new rule, we must follow the next step.
Create New Print Rule
We will access the Edit Print button

And a screen will appear to create and configure the Rule:
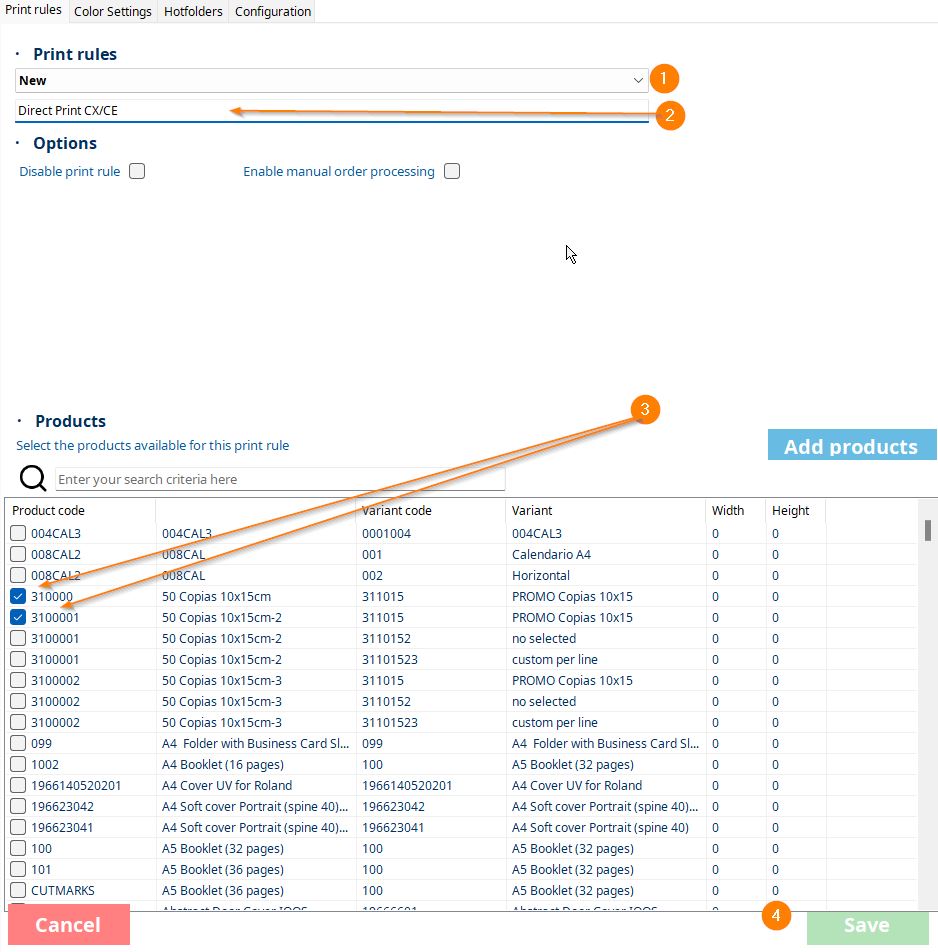
- In the dropdown, we ensure we are creating a new rule (New). If the name of an existing rule appears, it means we are editing it.
- We give the rule the name we want.
- We select the products.
- We save the changes.
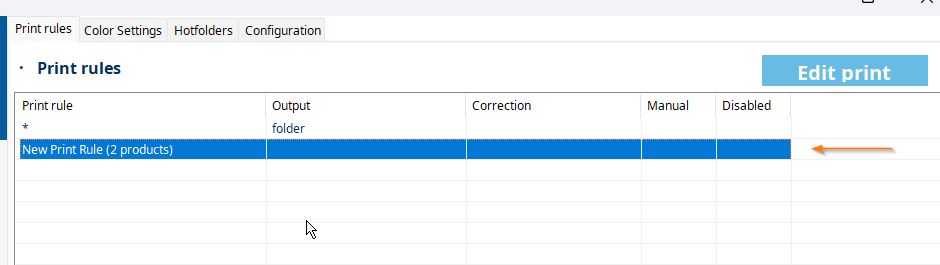
Once this is done, we will see the created rule:
If we want to change the output method, we just need to select the rule and follow the steps exactly as we did for the default rule.
We can see in the list that we are informed of how many products are in the rule. Now, every time orders are downloaded with these products, they will follow the established flow.
Example: New Print Rule for Folder Output
Imagine we have a copies product with two variants, one for size 10×15 and another for 15×20.
We access to edit the default rule (following the previous steps):

We write the name we want to give to the rule
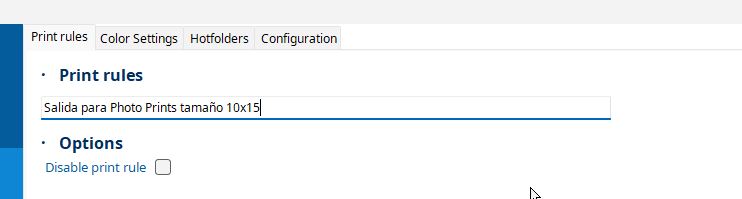
And we will search for the template(s) we are interested in, in this case, Photo Prints, size 10×15, select them, and save the changes.

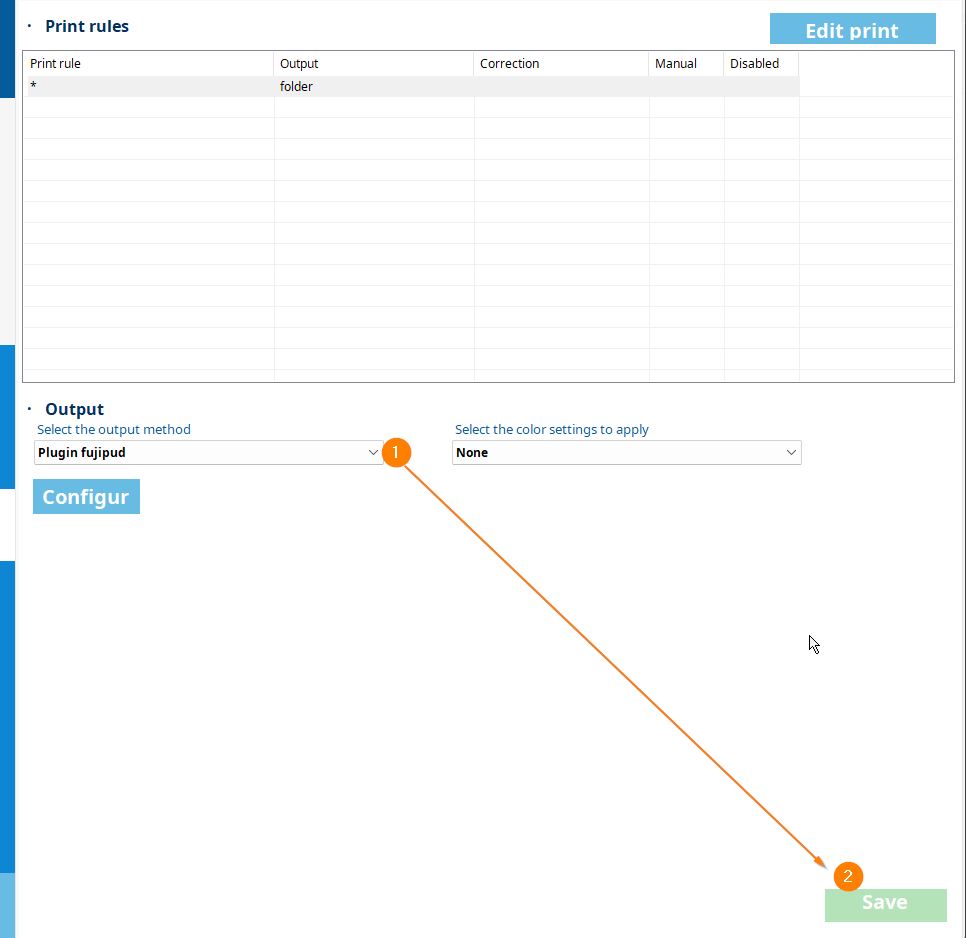
Next, we will see the new rule created, but the output needs to be defined:

For this, in the lower section, we select the rule we want to edit 1, indicate FOLDER output 2, set the path where it should be stored 3, and save the changes 4.

In this way, orders containing 10×15 size photos will always be stored in that folder.
Manually Add Product to Print Rule
It may be necessary to manually add a product, either because it is not in the list or because it is a local product (Station).
To manually add a product to the print rule, follow these steps:
- Select an existing print rule or create a new one
- Edit the rule

- Click the Add Products button to display the form that allows you to manually enter the product information
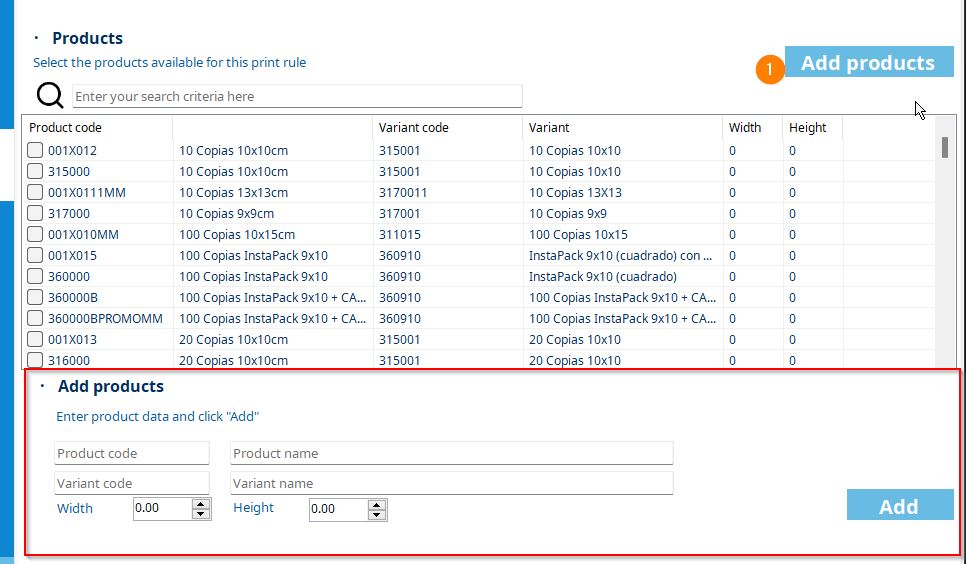
- Product Code and Product Name: This is the code and name of the template. The code must be the same as the one in the template; the name can be whatever you wish.
- Variant code and Variant Name: This is the code and name of the template variant. The code must be the same as the one in the template; the name can be whatever you wish.
- Width and Height: Dimensions.
- Product Code and Product Name: This is the code and name of the template. The code must be the same as the one in the template; the name can be whatever you wish.
- Once you have saved the changes with the Add button, you will see that the new product has been added to the end of the list of available products:
 You must select it (1) and save the changes (2) and you will see that it has been correctly added to the Rule:
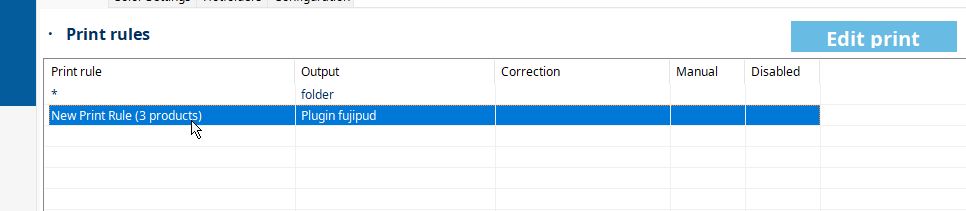
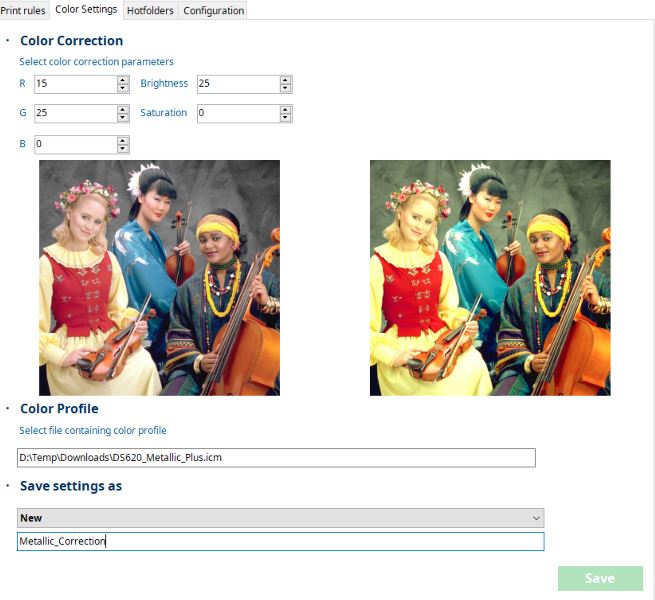
Color Settings
The color settings section allows you to store adjustment configurations that can later be applied to the processing of a print rule.
A color setting is composed of:
- Color correction parameters
- RGB
- Brightness/Saturation
- Color profile (icc/icm)
- Color profile file that will be added to the image.
Hotfolders
Hotfolders in PrintCenter are a functionality that allows automating order processing by continuously monitoring specific directories. This makes it easier for different teams (editing, printing, customer service) to automatically generate orders by depositing files into shared folders.
This is how they work:
Configuration:
In the hotfolders configuration section within PrintCenter, a path to monitor is defined, which is the directory the system will observe for new files or subfolders.
The product attributes to be associated with the orders generated from that hotfolder are also configured. These attributes may include:
- Product code or name.
- Variant code or name.
- Dimensions (width and height in millimeters). The size of the received images is resized using these dimensions to the longest side (FILL).
Subfolder processing:
Each subfolder found within the configured hotfolder automatically becomes an order linked to the product defined in that hotfolder’s configuration.
File processing in the root:
Files located directly in the root of the hotfolder are also monitored, allowing orders to be generated using the product attributes configured for the hotfolder, without the need to organize them into subfolders.
Example Practical – Subfolder:
- Path to monitor: C:\Orders\Hotfolder1
- Subfolder: ProductA_Variant1
- Attributes configured:
- Product: Product A (code: PA001)
- Variant: Variant 1 (code: VA01)
- Dimensions: 200 mm wide x 300 mm high
- Operation: By adding files to the ProductA_Variant1 subfolder, PrintCenter detects the content and creates an order for “Product A” with “Variant 1”.
Example Practical – Files in the root:
- Path to monitor: C:\Orders\Hotfolder1
- Files in the root: Files are placed directly in C:\Orders\Hotfolder1.
- Attributes configured for the hotfolder:
- Product: Product B (code: PB002)
- Variant: Standard variant (code: VB01)
- Dimensions: 150 mm wide x 250 mm high
- Operation: By placing files in the root of the hotfolder, an order is generated using the attributes configured for the hotfolder.

Performing a double click on a hotfolder opens an explorer in the configured path.

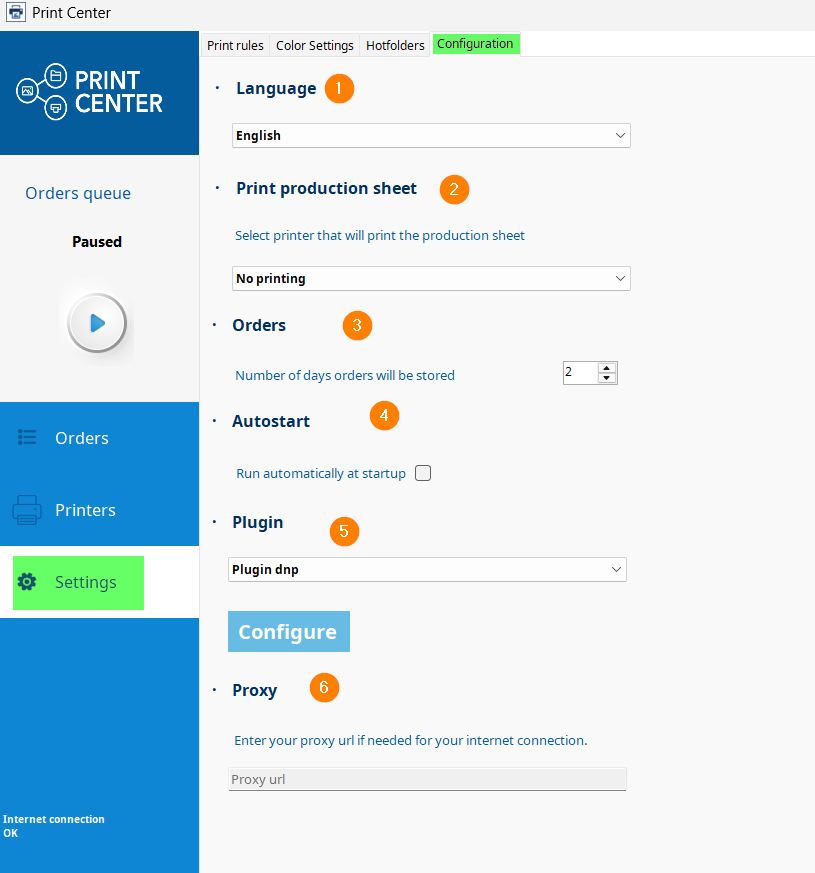
General Configuration
The configuration section accessible from Settings – Configuration allows the following actions:
-
-
-
Application Language
Select the desired language and click SAVE.
-
Production Sheet
The production sheet will be printed when processing an Internet order whenever one of the available printers in the system is selected. If no printer is selected, the production sheet will not print.
-
Days of order conservation in the Print Center storage.
After this period, orders will be deleted from the folder.
-
Automatic start upon operating system startup.
When activated, the Print Center automatically starts when the computer starts.
-
Direct access to print connector configuration.
We have reviewed the available connectors in this section.
-
HTTP Proxy configuration for connection management.
By inserting your HTTP proxy configuration, all your web traffic will pass through that intermediate server before reaching its final destination on the internet.
-
-