Product Catalogs in Printspot
Catalog administration in Printspot is a feature that allows the administration of products to be published on our main page.
Catalog administration for printspot.io is done by accessing the back office administration panel. Once authenticated, we will access the menus at the top by clicking on PRODUCTS.
From this menu, we will have access to different sections, located on the left side of the screen: Products, Templates, and Catalogs.
Catalogs
The management of catalogs in Printspot depends on the type of service we have contracted. It should be noted that the creation of products is managed from the Template Manager, and to gain access to it, you must consult the Imaxel team to obtain the appropriate permissions. If you want more information about the Template Manager, click here.
From the Template Manager panel, you can create the necessary products, which must then be categorized and managed in the Catalog to give them visibility.
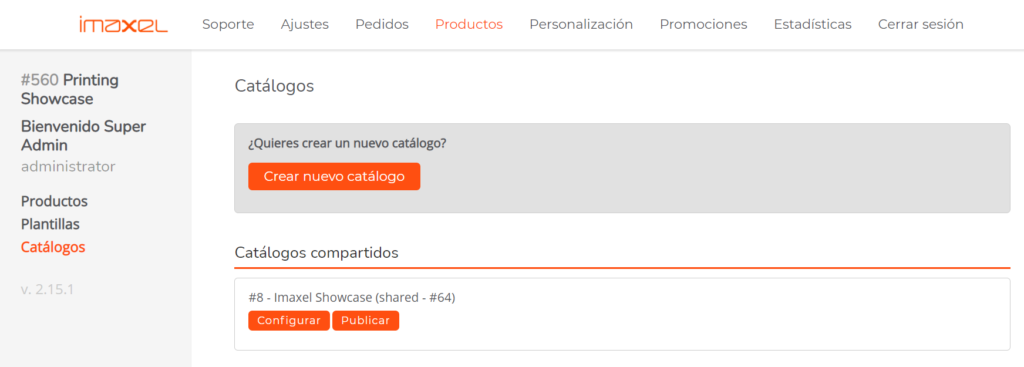
By default, catalogs are always published. If it is necessary to hide them to make changes or to deactivate them, select the Publish button corresponding to each catalog to manage it.
Types of Catalogs
Below we will detail the different types to be able to identify them.
- Shared Catalog: From a centralized management panel, access can be given to a shared catalog that an administrator has managed and published with a predefined category and product structure. This catalog is available to make certain changes such as:
- publish or hide a category or product on the Printspot home page
- change category or product icons
- change prices
- enable/disable product variants
- add a detailed product description before opening the online editor for more order detail
- it is not possible to change the position of the products
- it is not possible to add a product twice to a category
- Store’s Own Catalog: From the Printspot admin panel, it is possible to create a personalized catalog for the store. It is possible to manage a catalog using both the products from a shared catalog and the products from our own Services administration panel using the products we have created. This store catalog can make the same changes as a shared one, and can also change the position of the products.
A shared catalog is useful for organizing products for multiple stores simultaneously without having to enter each one. A store’s own catalog is the solution for individual stores, where total independence in management is required and synchronization with other stores is not necessary.
Shared Catalogs
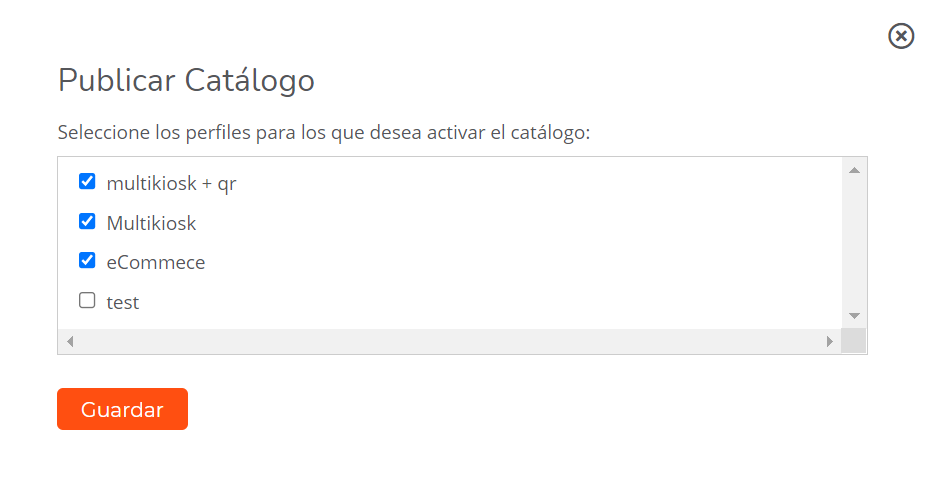
When we first access, the CATOLOGS configured to be administered in Printspot are displayed. By default, a Shared Catalog appears that we can configure to manage our products on the Printspot main page. Also, depending on the contracted profiles, we can publish or unpublish a catalog for a specific profile.
IMPORTANT NOTE: The products in this shared catalog have been created from the Services back office. From that panel, they have been created and parameterized so that a catalog is subsequently administered which will be shared with the different Printspot stores.
Therefore, prices, measurements, thumbnails, and other characteristics are already predetermined.
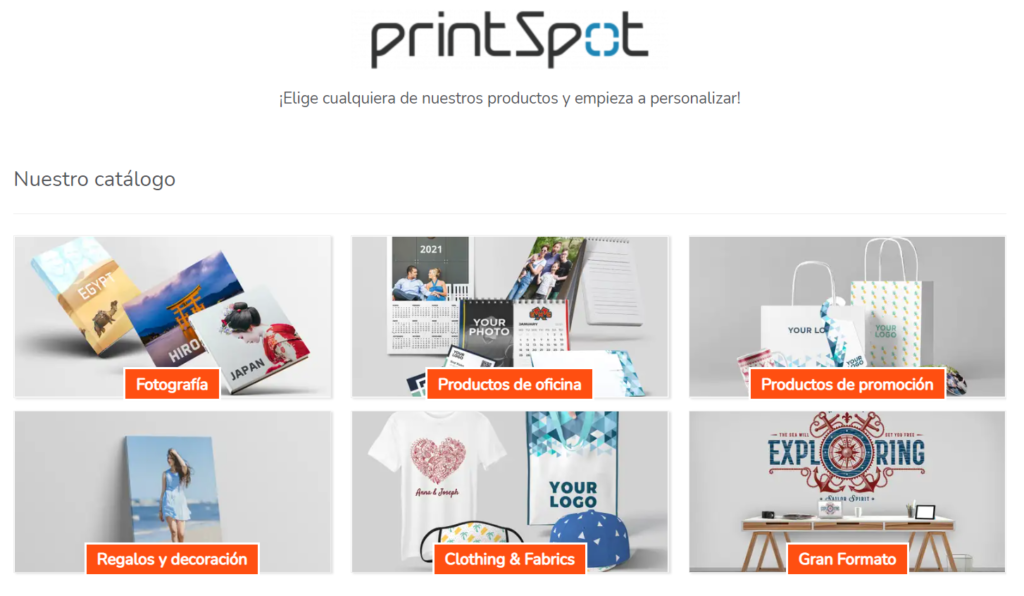
With this default catalog, we will already have products published on the home page that we can configure or publish/unpublish.
Configure Shared Catalog
The catalog published by default in Printspot is active and ready for use. Although there is the possibility of configuring it to change the visibility of products, change prices, and even representative images of collections and/or products.
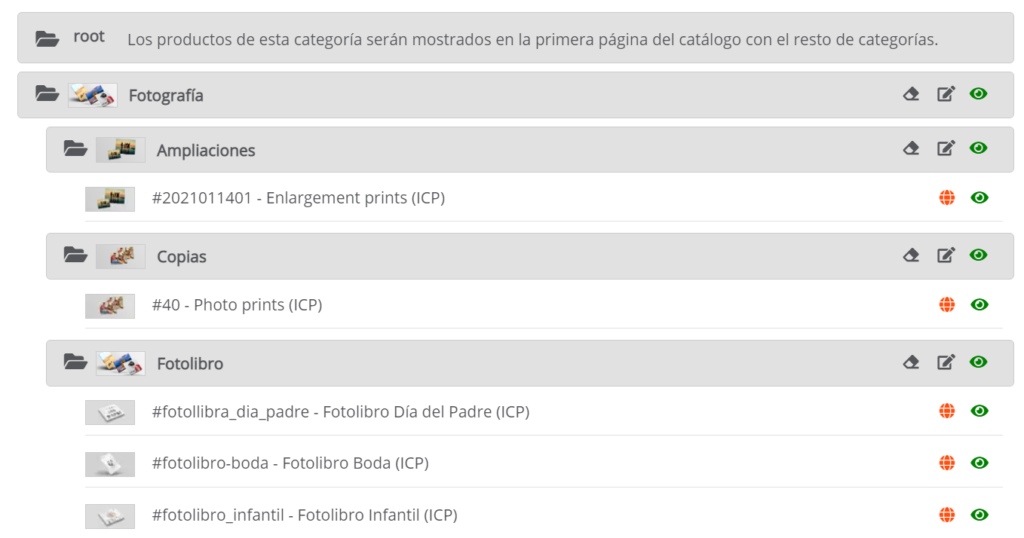
To be able to make changes in this shared catalog, we click on Configure and access a folder-tree-like panel where the active shared catalog can be managed.
Given that this catalog is shared, it implies that it has certain characteristics regarding what is allowed to be done.
A shared catalog means we do not own the catalog; therefore, we are sharing the defined structure, but we can make changes to adapt it to our needs. To be able to adapt it, we will explain what is permitted or restricted and the different icons in this panel for better understanding.
Permitted Configuration
Within the shared catalog, it is possible to manage categories and products by selecting the following icons:

Category Configuration
- Restore default values
- Edit
- Show / hide

Product Configuration
- Restore default values
- Edit
- Show product page
- Show / hide
Restore default values
If after editing a product or category we need to restore the default values, selecting this icon will revert the configuration and customization to the original state.
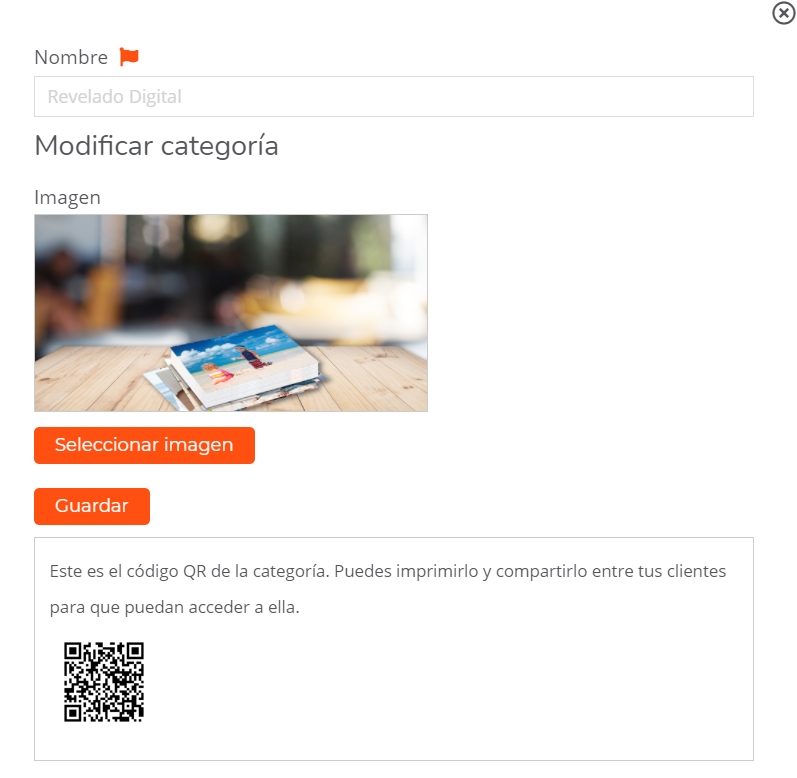
Edit Category
Selecting the edit icon for a category will bring up the following window. It will allow us to change the name or text by selecting the flag and the category image by clicking Select image. Clicking Save will automatically publish these changes.
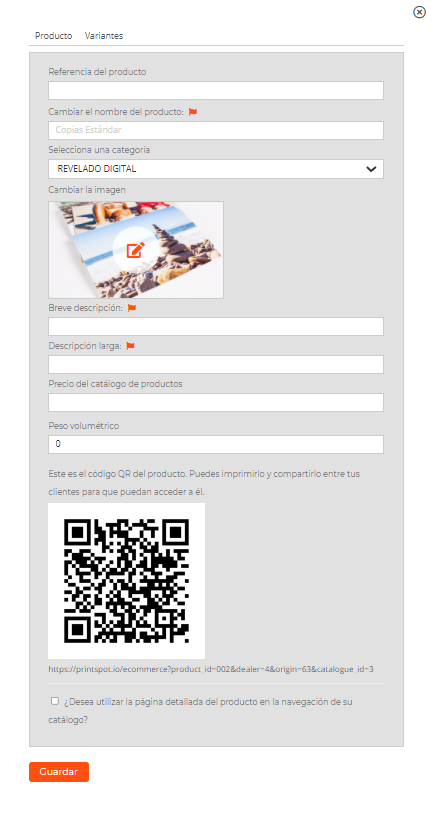
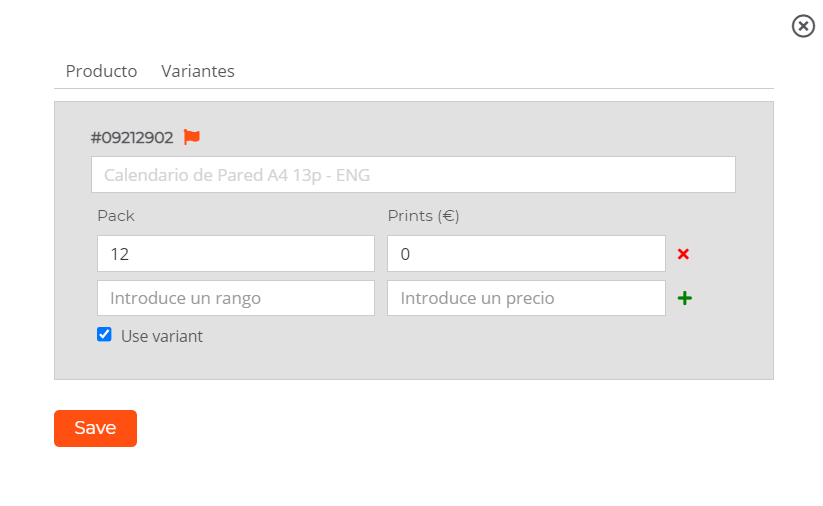
Edit Product
Selecting the edit icon on a product will bring up the following window. In this window, there are two options to configure: Product and Variants.
Product Tab
In Product, we can add a product reference, change the product name in different languages, add a Brief Description and a Long Description so that when the detailed product page is activated, they are shown before opening the editor. It is also possible to Change the representative image of this product.
Clicking the icon shows a template configuration menu that has two tabs: Product & Variants. These values have been previously configured from the Templates back office in Services. The system allows for double administration to speed up the publication of these templates in the catalog.
Product
In this tab, we can configure the presentation of the template on the Printspot main page. Therefore, it allows us to change different values that we will detail below:
Product Reference
Internal Printspot code. It is not currently active.
Change Product Name
This name comes from the template name configured in Services. Selecting the flag icon opens a language configuration window to translate the template names into different languages.
Select Category
From this option, it is possible to directly change the position where the template is displayed. It can also be reordered with the 4-arrow icon.
Change Image
By default, the product is shown with the icon administered from Services. But from this option, it is also possible to access the file gallery and upload an image to change the product image in the catalog.
Brief Description & Long Description
These are two descriptive texts that are shown in two different positions. They are text fields that can be formatted in HTML code. Therefore, they can contain graphic elements, line breaks, or shortcuts to URLs, among others. This HTML utility is inserted by copying and pasting the code, as the fields do not have their own editor to create the code.
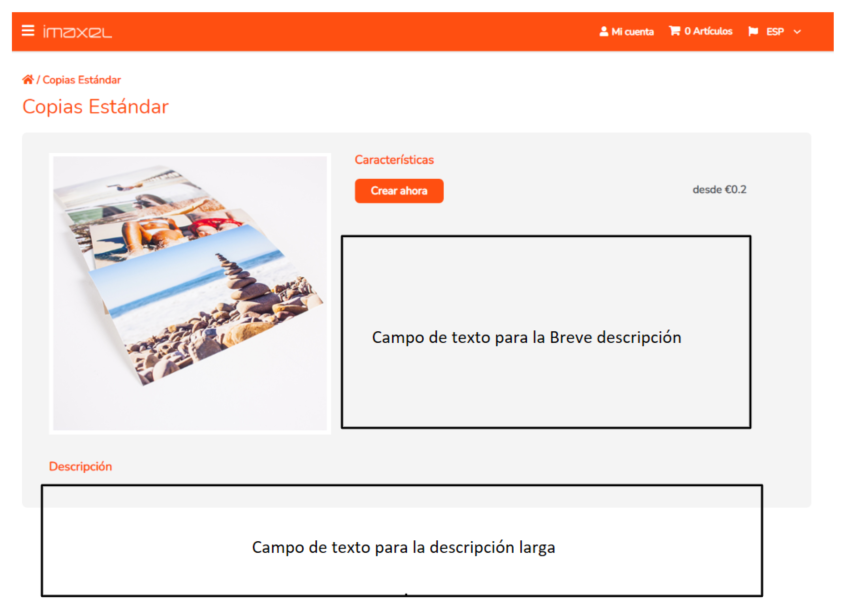
To check how the inserted texts are shown, there is a link at the bottom of the QR code that opens a detailed window containing the texts and the FROM amount of the lowest variant value.
Product Catalog Price
It is the price that we can show on the main page if in the LOOK&FEEL section of the main PERSONALIZATION menu.
We activate a product catalog price for this case in the Product tab.
If we activate the following configuration in the menu, activating the Product Catalog Price

The following will be displayed on the main screen…
If you want more information on managing store prices, click here.
Volumetric Weight
This is the value we assign as a concept of weight by volume so that the appropriate rate configured in the Shipping menu of the Printspot admin panel is applied.
QR Code
The back office generates a QR code that corresponds to the template link with the detailed screen. Clicking the code with the right mouse button allows you to copy and paste it to use it as needed.
Template Link URL
The generated URL can be used from a browser to carry out test orders or real orders since the order cycle will be complete.
Activate Detailed Product Screen
Check box that activates the screen where the descriptive texts of the product are shown and also informs of the FROM amount as the lowest price of the variants when the order is placed from the catalog.
Since the price is predetermined by Services, it is possible to use your own by entering the amount in Product Catalog Price.
Volumetric Weight is the value that identifies the weight of the product. This weight is taken into account in the weight range to be able to assign a shipping cost amount. In the printspot.io/…./admin Shipping section, Shipping Methods option, it is possible to create a pricing that considers the product weight to assign a shipping cost.
The QR code is generated automatically and can be used for both categories and products directly. Scanning the code takes the browser to a screen where an order can be created with that product. The QR code is generated by the URL that identifies the product. It is also possible to use this link to integrate the product into a website.
The checkbox to activate the detailed product page in the navigation of your catalog is a different way to access the product that can help promote or detail characteristics for better understanding by the end user.

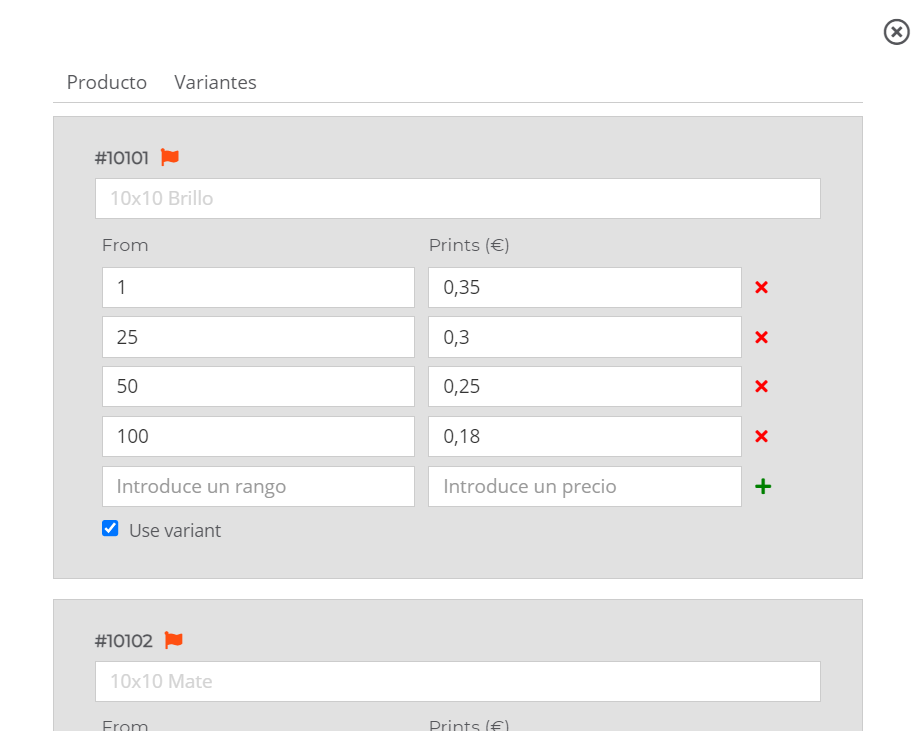
Variants Tab
The product variants configured in the Services back office are configured here by default. Depending on the type of Editor selected in Services, the information is displayed differently in this tab.
In this case, the editor selected for copy configuration is the Copy Pack editor.
Selecting the Variants tab makes it possible to change: Variant Name, add or change quantity ranges and the prices for those ranges, as well as disable the variant if we do not want to publish it in our catalog.
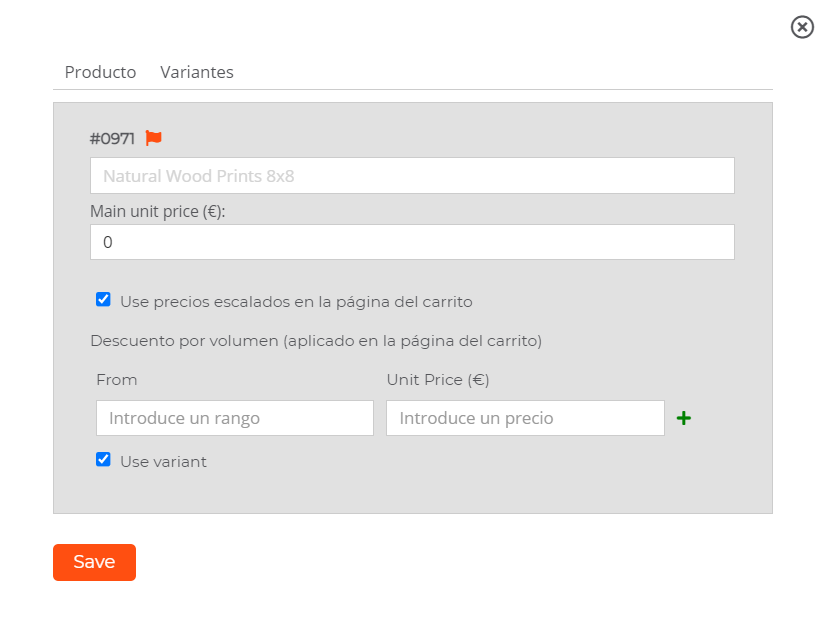
In the case of a product created with the Large Format editor, since quantity discounts cannot be created in the Services administration, we have enabled a system where it is possible to create a volume discount when the order is in the cart.
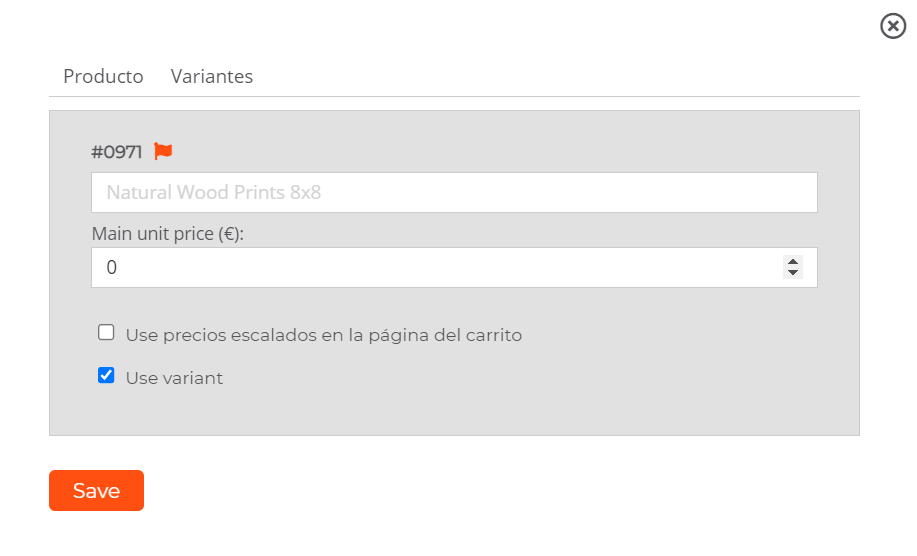
Selecting the “Use scaled prices on the cart page” checkbox displays the appropriate fields to configure the unit ranges and the corresponding price.
NOTE. In the case of an editor that supports range prices from Services, for example a product with 12 sheets like a calendar, it is not convenient to change the pack number from this tab, but it is possible to change the price.
Show Product Page
Selecting this icon opens a link so that an order can be placed with that product. It has the same effect as copying and pasting the product code URL.
It allows you to check the product and the changes we have introduced in the configuration. You can access said product and create an order until the entire purchase process is completed.
Show / Hide a Category or Product
Activating the eye icon achieves the goal of hiding or showing a category or product on the Printspot main screen.
When the icon is active, the green color is visible, and when it is hidden, the icon changes its appearance to crossed out.
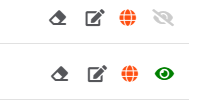
-> hidden product
-> visible product
Create a New Store Catalog
The previous explanation showed how to configure a shared and predefined catalog. For this, we could customize certain aspects, such as product or category name, prices, and hide the products or categories that interested us.
But if our intention is to create a personalized catalog for our online store using the products from the shared catalog but changing the location of the categories, we can create a Store Catalog.
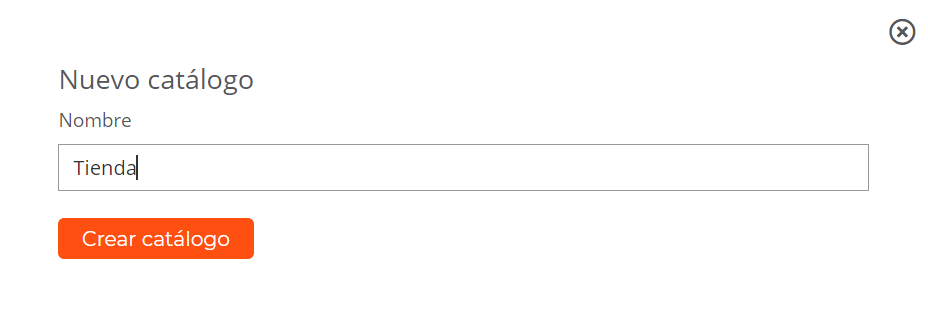
If we click on Create New Catalog, a window will open to name our catalog and then configure it. If necessary, it would be possible to create as many catalogs as we need. In principle, no more than one is needed to manage products.
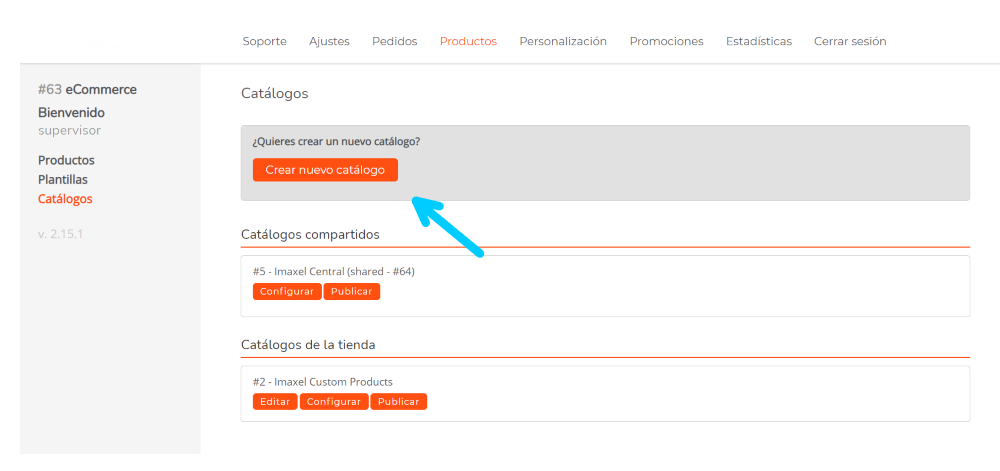
Selecting Create New Catalog will display a window so that we can assign a name to the new store catalog. For the example, we will use the name Store.
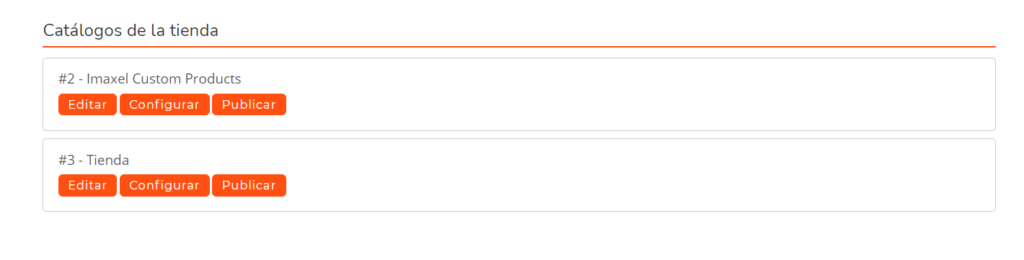
A new store catalog will have been created, ready to be configured. Two buttons are automatically enabled to Configure and Publish the catalog.
Configure Store Catalog
If we select Configure, a new screen will appear to manage the products and categories of the new catalog.
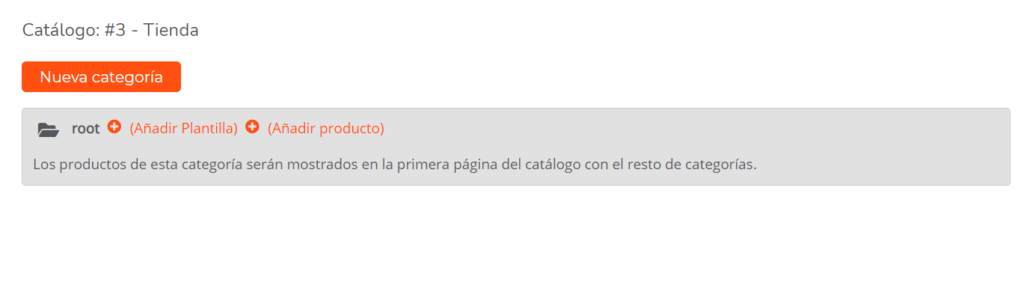
Categories
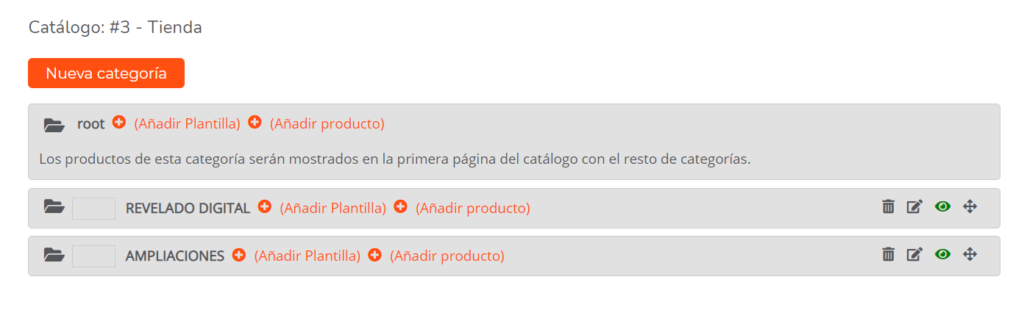
Categories are based on a structure similar to file folders. There is a main or “root” parent folder on which the rest depend.
It is ideal to have thought about how the catalog will be displayed, for example, what category structure should be shown and whether they will have subcategories. Therefore, we can proceed to create the different category levels.
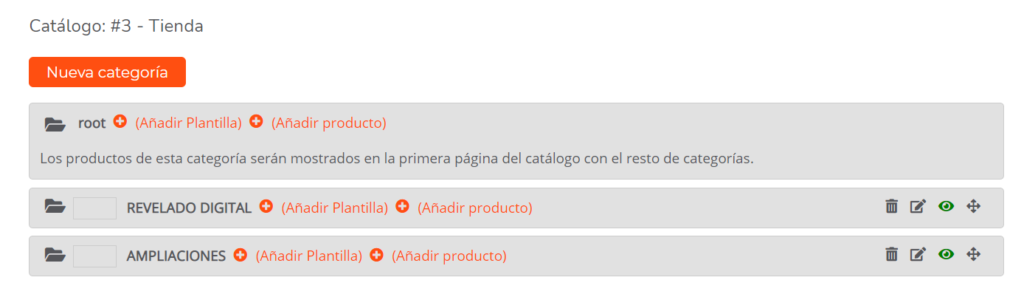
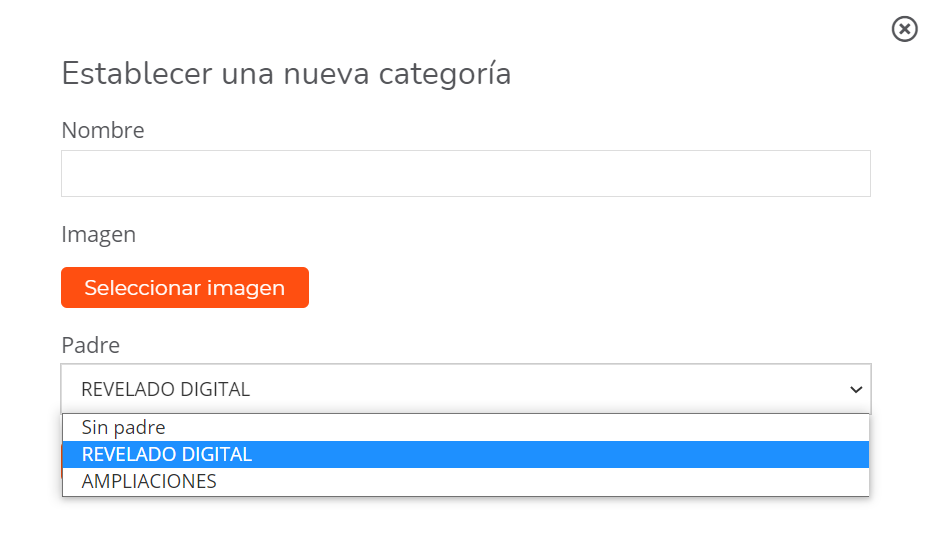
We select New Category and we will create the first and second level that will appear in the upper left part of the main screen. For example, we will call it DIGITAL DEVELOPMENT and ENLARGEMENTS.
Since these categories have been created dependent on “root,” they can, in turn, contain subcategories that depend on them.
In case you need to create sub-categories that depend on DIGITAL DEVELOPMENT or ENLARGEMENTS, you must indicate who they depend on in the Parent selector.
As many subcategories as necessary can be created, but it should be noted that the greater the complexity of subcategories, the user may perceive a poor experience and abandon the purchase process.
It is also possible to add products without a Category since many products or templates created in Services have different variants or attributes that make them selectable even if they are not within a category. We will explain this point later when we detail and differentiate between Products and Templates.
When creating a category or subcategory, icons have been activated to allow them to be managed.

Delete Category or Subcategory
Selecting it displays an alert message informing you that the products within the category will be moved to the parent category.

Edit Category or Subcategory
Selecting it displays a window that allows you to Modify the Category.
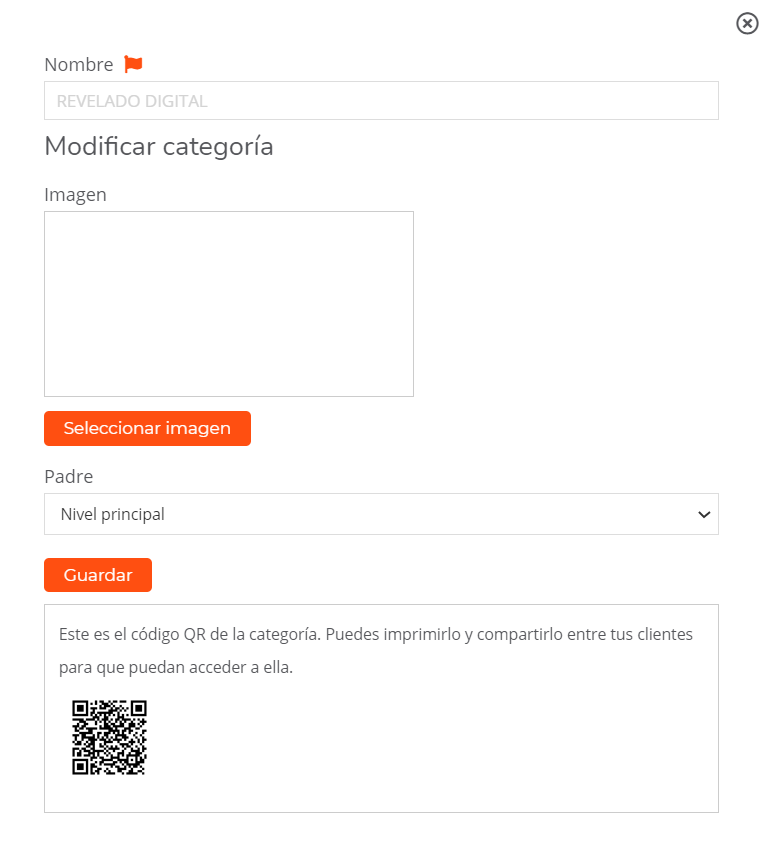
Modify Category or Subcategory
From this window, it is possible to change the name in different languages that will be activated depending on the browser’s language.
Change the representative image of the category.
Select or change the Level on which the created category depends.
The QR code that we can copy and use for promotions on social networks appears at the bottom of the window.

Hide or Show Category
Due to stock needs, it may be necessary to hide a category or subcategory from our main page. This button shows or hides it. When the icon is green, the category is active.

Move Category
This icon allows us to move the order of appearance of the category or subcategory on the main page.
Add Template or Product
The catalog allows adding both Templates and Products to manage them and have them published in our catalog.
Either of the two can be at the root folder level or within a category or subcategory.
Add Template
Next, we will describe how the management of a **Template** is performed.
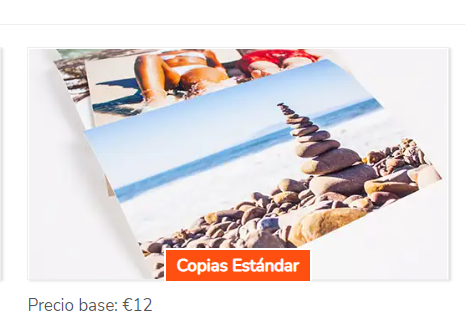
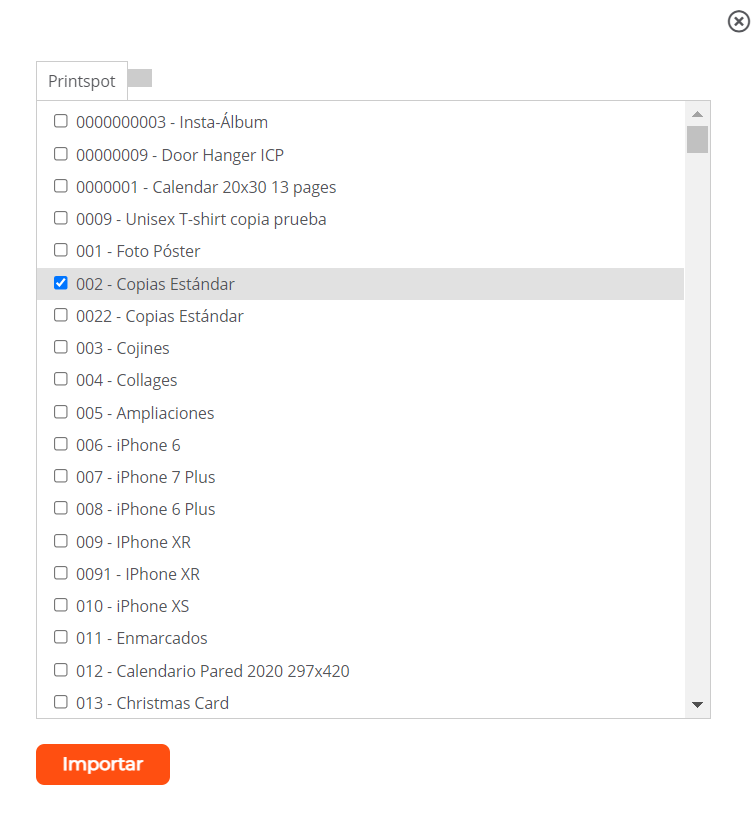
Selecting any of the Add options opens a new window that allows us to import a template or product. Once selected, we click Import and it will appear in the position from where it was selected. Following the example, in the created category DIGITAL DEVELOPMENT, we are going to add a Template 002 Standard Copies.
As a result, Printspot will add the template within the selected category and will configure it as hidden by default, with the eye icon in gray and crossed out, to prevent the product from being published without having been reviewed beforehand.
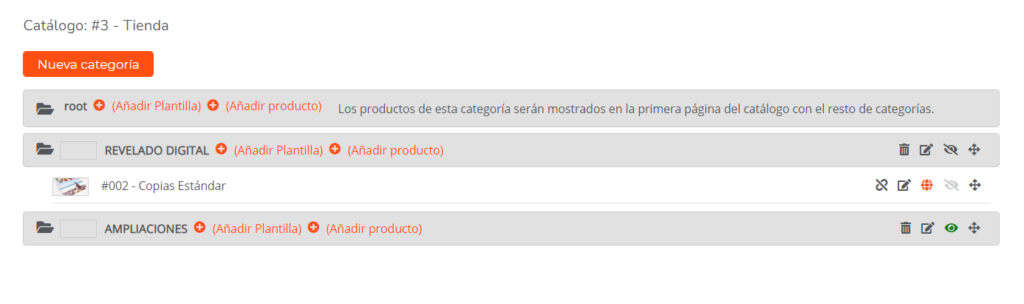
Now the template is ready to be configured and published. For this, we have some new icons that help us in this management:

Disconnect Template or Product
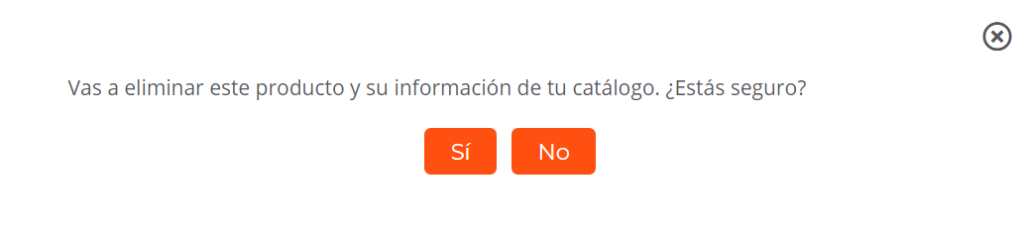
This icon will serve to disable the template or product in case we need to unlink it. When selected, a message appears indicating that you are going to delete it, but the only thing it deletes is the catalog link

Edit
This option is only active for templates. Selecting this icon allows us to configure the template we have selected from our available list. Products are edited from the menu on the left, so they do not have an edit icon in this section.
To see details, see the Edit Product section by clicking here

Show Product Page
This link will open a URL that links to the online editor so we can properly configure how the end user will see the product on screen to edit it.


Reorder
This utility allows us to reorder the position of the template or product in the catalog so that it is displayed in a certain way. With this “drag & drop” function, the order of the catalog can be easily reorganized.
Add Product
Selecting Add Product displays a window with the products that are available to select and import. There are two types: Network Products and Store Products.
Network products are administered at the central catalog level. Store products, however, are those we have created for the store itself by cloning network products or creating new ones.

Once selected and imported, the products are shown hidden by default.
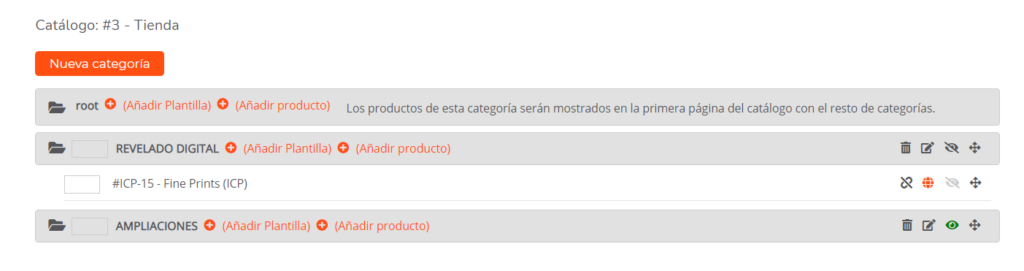
The chosen product is shown with the initials ICP to distinguish it from the templates created with the Template Editors from Services.
The icons for configuration have already been detailed in the previous points and have the same function.