How can We help you?
How to create a PhotoBook template with Printspot
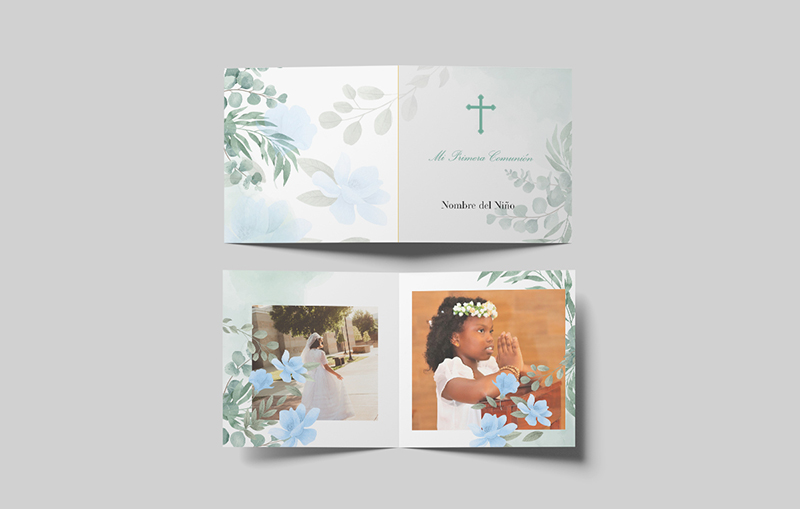
In this tutorial, we will show you how to create a communion photobook template using a graphic editing program (Photopea, Photoshop, etc.) and Printspot’s responsive Photobook editor.
Learn step by step how to do it. To demonstrate, we will create a communion booklet template with you. Download the materials used in the tutorial here to follow along.
Step 1: Preparing the photobook template design
Exterior Part:
- Open Photoshop (or any graphic editing program).
- Create a new document of 15×15 cm.
- Design the exterior part of the booklet, allowing the user to insert their text.
Interior Part:
- In the same document, create the interior part.
- Define the spaces where the user can place their images.
- Add design elements that overlap the images to give a professional layout touch.
Step 2: Using Printspot’s Responsive Photo Book Editor
Template Configuration:
- Open the responsive Photo Book editor.
- Create a new template and assign a code, name, and thumbnail.
- Activate the communion-themed cliparts.
- Set the size of the booklet (15×15 cm) and add a 4 mm bleed.
- Set the output file to PDF (it can also be JPG).
Step 3: Creating the Model Associated with the Template
- Click on “Create model” in the editor.
- Upload the images previously prepared in Photoshop.
- Place the graphic elements in the editor’s workspace.
What is a model? A model associated with a print template represents a graphical edition of the template that allows interactive editing.
Step 4: Configuring Permissions
Exterior Part:
- Select the exterior image and apply it as the background.
- Set permissions so that the user can only add text over this image.
- Configure the text box so that the user can change the text and font, but not move or delete the box.
Interior Part:
- Place the graphic elements following the coordinates from Photoshop.
- Allow the user to change the images, but not move the graphic elements.
- Configure the permissions for each page, allowing only text addition if necessary.
Step 5: User Preview and Editing
- Save the template and the associated model.
- Access the editor to see how the final design looks.
- The user can upload their photos and place them in the allowed spaces, adding text if desired.
- Once finished, the user can add the booklet to the cart and complete their order.
See the result here.
Contact us